Wednesday, July 29, 2020

Tomato Bisque Soup

Hi foodies, I am so excited to share my next recipe with you all today! It's been raining here in Texas for last few days and one of my most favorite food to eat on the rainy days is warm and comforting soup. I absolutely love Tomato Bisque soup for any meal of the day but especially on those gloomy dull days. I feel so lazy on the rainy days that I want to minimize my time in the kitchen. This warm soup can be made with a very few ingredients from the pantry and doesn't require a lot of efforts. The simple yet hearty soup is easy to prepare and can be enjoyed as an appetizer, a side or a meal in itself! 


So the first question that would arise in our mind is whether the Tomato Bisque soup is same as Tomato soup. The simple answer is No, these two are different. The Tomato Bisque has creamy, rich and velvety texture that is achieved by adding cream while the traditional Tomato soup doesn't use this key ingredient. The best part is you can make this soup vegan by just substituting the cream and butter with the full fat coconut milk and nut butter or oil, respectively. So anyone can enjoy this luscious soup without compromising on the texture. 

My family devours this soup every time I make it, and trust me, I make it very often as I am one of the biggest fan of tomatoes. Growing up, me and my sister both were fond of tomatoes so much that my mom had to buy surplus tomatoes for us every time she gets groceries. We would gobble down tomatoes as if they were apples! Even now my grocery would always include tomatoes and if I don't have it on my list my husband would get them for me just in case...

Since tomatoes are the star ingredient for today's recipe, let me first share some health benefits of eating tomatoes. According to various sources, tomatoes are full of antioxidants from Vitamin C,


specifically lycopene, which helps reduce risks of heart disease and cancer. Tomatoes are also an excellent source of vitamins and minerals like vitamin A, K1 and potassium. Vitamin A helps improve vision and skin while vitamin K is good for bones, and potassium helps control blood pressure. Also, tomatoes are low in calories and carbs and has almost zero fats!

So without further delay, let's get started with the recipe...

Tomato Bisque soup 

Serves 4-6
Prepare time 10 minutes
Cook time 15-20 minutes

Additional notes/ Tips

  • There are two different ways you can make this warm delicious soup. You can either make it in an electric cooker or in a pressure cooker. I have made the soup using electric cooker but I will share the recipe for both. 
  • You can use either fresh tomatoes or canned tomato puree. I have used canned tomato puree. If you are using fresh ripe tomatoes, then blanch them first by adding them to boiling water for about a minute. Run under cold water and peel the skin off. Next de-seed the tomatoes and dice them. This step requires additional 10 minutes.
  • To reduce the amount of heavy cream, I have also added some soaked nuts. If you wish to go with just the cream, then double the cream quantity from the recipe. 
  • You can easily make this soup vegan by adding full fat coconut milk (canned) instead of heavy cream. 
  • Increase quantity of dried basil, if you don't have fresh sweet basil handy. 

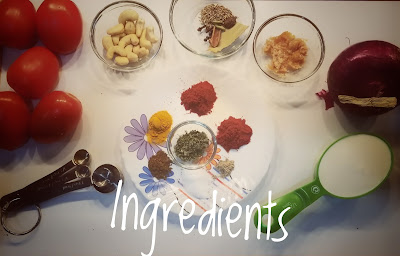
Ingredients

1 Can tomato puree or sauce (28 oz)  
2 Medium carrots chopped
2 Sticks of celery chopped (optional)
1 Small or 1/2 Medium white onion chopped
1 Tbsp minced garlic
2 Tbsp olive oil or butter
Handful of fresh sweet basil leaves (optional)
1/4 Tsp dried basil
1/4 Tsp thyme (optional)
1/4 Tsp dried oregano
1/2 Tsp black pepper powder
1/4 Cup heavy cream
Handful of soaked cashews or almonds (soak for at least 30-45 minutes prior)
2 Cups of water or vegetable stock
1 Tbsp honey or sugar
Salt to taste

Instructions

Heat up oil or butter in the electric cooker or pressure cooker.


Add chopped white onion and minced garlic. Saute for about a minute until raw smell of garlic is gone.


Add carrots and celery (optional), saute for 2 minutes until onions turn translucent.


Add Tomato puree or diced tomatoes, dried oregano, dried thyme, dried basil, salt, black pepper powder soaked nuts, and water or vegetable stock. 


Stir well, close the lid of the cooker. Set the electric cooker on pressure cook at high pressure for 9 minutes. If you are using pressure cooker, cook it for about 15-20 minutes and 4-5 whistles. 

Turn off the heat, and safely quick-release the pressure of the electric cooker. For traditional cooker, let the pressure release naturally.

Open the lid, stir in chopped sweet basil leaves, honey/sugar and heavy cream. Blend to a smooth puree using immersion blender.


Transfer soup to serving bowl and garnish with basil leaves and cream. Serve with toasted bread sticks.


Saturday, July 25, 2020

Thai Red Curry


Hi foodies, its time for another delicious flavorful recipe! Today, I am going to share a very easy-to-prepare recipe for the Thai Red Curry. 

I am fond of Asian cuisines including Thai, mostly because the preparations are distinct in flavor! They are rich in texture and have complex flavors that suits perfectly for my foodie palate as I am all about flavors and spices. What attracts me more to Thai curries is the ease of adding versatile veggies along with protein. It makes a complete meal when combined with white, brown or fried rice. 

The base gravy for Thai red curry is prepared using Coconut milk. It makes the curry rich and creamy.  Consuming Coconut milk in moderation could provide some great health benefits as they are high in mineral and vitamins including calcium, potassium, magnesium and iron. 


The other important ingredient in this curry is Tofu. According to some sources, Tofu was originally called "Okabe" until early 1400s. It didn't come to western world until around mid 1900s. In fact I wasn't even aware of this protein rich alternative to meat until early 2000s. Since we are making vegetarian version of the curry, I highly recommend to add protein in the form of Tofu. Apart from providing high contents of protein, this substitute of meat is low in calories and is an excellent source for calcium and iron. Additionally, it contains all essential amino acids, magnesium, zinc and Vitamin B-1. Tofu has zero cholesterol in it and may also help reduce LDL (bad cholesterol) in our bodies. I would suggest you try to include Tofu if you are able to find it in the nearby grocery store.

One more key ingredient in this recipe is the rainbow of vegetables. As I mentioned earlier, the recipe is so flexible that you can add versatile vegetables of your liking. The more vegetables the merrier the curry. Needless to say that vegetables have abundance of nutrients, you can take your pick! Apart from being low on fats and calories, mostly all the vegetables are high in dietary fibers and are loaded with minerals and vitamins. You could experiment with different vegetables each time you make this delicious warm curry! 

So let me bring to all of you, my version of Thai red curry loaded with vegetables and tofu.


Tips (Additional notes) - 

  • Any assortment of vegetables can be used for this curry. Here is a list of some popular vegetables for this curry - broccoli, yellow squash, zucchini, bamboo shoots, cauliflower, etc.   
  • It is absolutely okay to use store bought red curry paste, as sometimes it is difficult to find all the ingredients needed to prepare it at home. I use store bought vegetarian curry paste free of shrimp or fish oil. Be sure to check the ingredients before buying any store brands. 
  • Try to use full fat or premium coconut milk to add richness to the curry.
  • You can use dry basil if fresh sweet basil is not available.
  • Tofu is optional, I like using firm or extra firm. You can also saute them in a pan before adding to the curry. 
  • If you are omitting tofu then you  may want to add more vegetables to the curry.
  • Simply increase coconut milk and water quantity if you like more gravy.


Ingredients -
Serves 4
Prepare time - 10 minutes 
Cook time - 25-30 minutes 


1/2 Green bell pepper 
1 Carrot     
6-8 Mushrooms 
4-5 Baby corn 
10-12 String beans
Handful of Sweet basil leaves 
            

1 Can Coconut milk (Preferably full fat/premium)
1/2 Block Tofu (Optional - Preferably firm or extra firm)
2 Tbsp Red curry paste 
1 1/2 Tbsp Oil
2 Tsp Soy sauce
1 Tbsp Lemon juice/ 1 Tsp Vinegar
1 Tbsp Peanut butter (Optional) 
1 Tbsp Honey/ Sugar
1/2 Cup Water
1 Tsp Sriracha (optional)
Salt to taste


Instructions - 


Evenly slice all the vegetables including carrot, bell pepper, string beans, baby corns and mushrooms. I sliced them about 1/3" thick. This is important to ensure veggies are cooked evenly. 


Heat up oil in a wok or a pan, and add all the sliced vegetables except mushrooms. 


Saute the veggies for about a minute or until the veggies are slightly cooked. Then add mushrooms and saute for another 2-3 minutes. We want the veggies to remain crunchy and not become soft or overcooked.


Now add salt, soy sauce, red curry paste, peanut butter and honey/sugar to the vegetables. Mix the spices and sauce well without breaking the sliced vegetables. 


Add coconut milk and water to the veggies. Keep the flame on low and let the curry simmer for 2-3 minutes, until bubbles start forming and oil begins to separate.


Add lemon juice or vinegar to the curry. Cover the pan and let the vegetables soak all the flavors for about a minute.

Simmer on a medium flame for 3-5 minutes, stirring occasionally, until the desired consistency of the curry is achieved and the vegetables have softened to your liking.  

Finally, add sliced tofu and roughly chopped sweet basil leaves. Gently mix the tofu in the curry. Simmer for one more minute.


Turn off the flame, transfer the curry to a bowl, and garnish with sweet basil leaves.


Serve this warm comforting curry in a plate with either white, brown or fried rice. You can also sprinkle some red chili flakes or add some sriracha for a little more punch.


Wednesday, July 22, 2020

The cooling Beetroot & Mint Raita (Salad)


Hi foodies, today I am going to share a very simple yet very appetizing recipe - The cooling Beetroot & Mint Raita (Salad). It is a quick, easy recipe and a must try for this summer! The combination of crunchiness of beets, the freshness of mint leaves and the creaminess of yogurt is simply unbeatable. I stumbled upon this dish earlier this year when I was trying to find low carb diet recipes. I have tried different versions of it but this one by far is my favorite as it has zero oil and zero sugar. 
                             

I immediately fell in love with this Raita (Salad) as it is not only healthy but also a delicious dish that can be eaten as a side or as a meal by itself. I plan to gobble this dish as my meal at least once a week, especially in summer. 

For a long time, I was consuming beets as a simple salad. I would boil, peel and slice them out on a plate. Though I always knew there are abundant health benefits attributed to this amazing root vegetable, I always struggled about finding ways to consume them until recently. In last few years, I have tried and tested different recipes using beets and trust me this vegetable has never failed to impress me. Beetroots are gifted with natural sweetness and are low in calories, low in fat and a great source of fiber, vitamins as well as minerals such as folate, potassium, iron and Vitamin C. They also help improve blood flow and lower blood pressure. These are just few of their numerous health benefits. 

On the other hand, mint leaves apart from giving cooling sensation, help improve digestion, provide anti-inflammatory and anti bacterial benefits. 


Lastly, yogurt is a great way to consume the much needed nutrients for our body. The active cultures (Probiotics)  in yogurt benefit our digestive system. Yogurt not only contains higher percentage of vitamins and minerals like calcium, vitamin B-12, phosphorus, potassium, etc. but it is also an excellent source of protein. 


So with all these amazing health benefits combined in one power packed dish, this recipe is a jackpot and can't be missed for any reason! This is my version of the cooling Beetroot & Mint Raita and I am sure you and your family will enjoy it as much as we do. Let's get started...


Ingredients -

2 Small or 1 Medium beetroot  
Handful of mint leaves
1/2 Cup whole milk yogurt or Greek yogurt   
1/2 tsp black salt
1 tsp cumin powder
Salt to taste 


Let's prepare it...


Peel the beetroots and coarsely grate or shred them using a grater. Transfer the shredded beetroots in a bowl.


Roughly chop the mint leaves and add them to the shredded beetroots.


Now add salt, black salt and roasted cumin powder to the mixture. Please keep in mind to add little less salt than you normally desire as we are also adding black salt to the Raita. You can always add more salt later if you like.


Next add whole milk yogurt or Greek yogurt. Mix everything well coating the beetroots with yogurt and spices.


Garnish with a spring of mint leaves and voila... the cooling Beetroot & Mint Raita (salad) is ready!


At this point you can either put the Raita in the fridge for an hour or two before serving, or you can serve it right away (you can use cold yogurt if you plan on serving it immediately.)


Additional note -

I have not used any oil to make this Raita but if you wish you may also add some tempering to it. 
To temper, heat up some oil and add some mustard seeds. When crackled, fry some curry leaves and pour temper evenly over the Raita.

Sunday, July 19, 2020

Restaurant style Shahi Paneer (The Royal Cottage Cheese)


Shahi Paneer is one of the most popular North Indian Paneer delicacies made in India. Shahi Paneer literally means the Royal Cottage Cheese. Though it is known as North Indian curry, this curry has its roots in Mughlai cuisine. The name comes from the richness and flavors of the gravy that the Paneer is prepared in. The richness and creaminess of the gravy comes from the use of cashews, cream (malai), tomatoes and onions, while the flavors come from the use of whole spices. The thick creamy gravy can easily leave one craving for more! Whenever I make this delish curry at home, I make some extra gravy so that we can devour the gravy with Parathas or rice. 


Since we are talking about Shahi Paneer and its richness, it naturally brings us to think if this is a healthy meal that you would like to prepare for the family. So let me tell you, Shahi Paneer may not be a dish that you would like to prepare for your daily diet but this is definitely a show stellar if you are preparing it for an occasion or for a weekend treat. Moreover, you could make this dish healthier if you take certain measures like using Ghee (Clarified butter) instead of butter or substitute some of the cream with yogurt. Also, I avoid frying Paneer which saves us from a lot of unwanted fats and calories. You can serve the curry with whole wheat Roti, Paratha or naan (what I usually do) instead of rice or white naan (made from maida/all purpose flour). 


Oh and let's also review some health benefits of the ingredients. Paneer is freshly made cheese by curdling milk and is an excellent source of proteins, calcium, selenium and potassium. Paneer also contains Omega 3 and Omega 6 fatty acids that helps strengthen your bones and teeth. Thus, it is very important for vegetarians who do not get sufficient intake of these nutrients from eating meats or eggs. I usually try to prepare Paneer at home rather than buying from the store. It is very easy to prepare, as it takes only a few minutes to make it and is free of preservatives. On the other hand, the whole spices used to make the gravy help with digestion along with providing a lot of health benefits including anti-diabetic and anti-inflammatory benefits. So here's the rich and healthy dish to please your palate for an occasional retreat...

Let's start from gathering ingredients for this restaurant style Shahi Paneer. 

Ingredients  (Serves 4)
Prepare time - 15 minutes
Cook time - 35 minutes


5 Medium tomatoes
1  Large Onion 
1 1/2 Tbsp Ginger Garlic paste
200 - 250 gm Paneer 
1/2 Cup Heavy cream/ Malai
10-12 Pcs Cashew
1 Tsp Jeera (Cumin seeds)
3 Cloves
1 Cinnamon stick 
2 Pods Green cardamom 
1 Pod Black cardamom 
4-5 Peppercorn 
1 Bay leaf
1 Tbsp Kasoori methi
1 Tbsp Kashmiri red chilli powder (divide into 2 parts)
1 Tsp Turmeric powder
1 Tsp Garam masala powder (optional)
1/2 Tsp Sugar (optional - use if tomatoes are sour)
1/4 Tsp Cardamom powder 
1 Tbsp Oil 
1 Tbsp Ghee (Clarified butter)
2 Tbsp Butter
1/2 Cup Water
Salt to taste

Let's begin cooking...

Take a big saucepan or kadhai and heat up Ghee and Oil at a medium to high flame. 


Roughly chop tomatoes and onions; add them to the saucepan. Lightly saute for 1 minute on a medium flame without turning the onions brown.


Now add Ginger garlic paste and mix it well. Saute for another minute or two until the raw smell of garlic is gone. 


Next add all the whole spices including Jeera, Cloves, Cinnamon, Green cardamom, Black cardamom, Peppercorns and Bay leaf  along with Cashew pieces. Mix it well.


Add powdered spices including Garam Masala (if whole spices in above step are not added), half of the Kashmiri red chilli powder, and Turmeric powder.


Add water and cover the pan or kadhai with a lid. Let this mixture cook for about 20 minutes at a medium flame while stirring occasionally.


Now turn off the heat and remove all the whole spices. I removed Cloves, Cinnamon, Green cardamom, Black cardamom, Peppercorns and Bay leaf. But you can leave black Peppercorns in, if you like to make it little more spicy. 


Let the mixture cool down completely before adding everything to the the blender. Blend everything into a smooth gravy. 


Take a big strainer and sieve the gravy into a bowl, this step is essential to make silky smooth gravy. Discard the residue.


Now heat up a saucepan or kadhai and add butter. When melted, add remaining Kashmiri red chilli powder. Give it a quick stir, don't let it burn. 


Immediately add sieved gravy to the saucepan and mix well. 


Now add Heavy cream/ malai (leaving some aside for garnishing), Cardamom powder and Kasoori methi powder to the gravy, stir it well. Kasoori methi is a must in any North Indian recipe.. don't skip it. 


It's time to add the main ingredient of the dish that defines the curry - Paneer. Add cubed Paneer pieces and gently mix everything without breaking the Paneer cubes. 


Cover and simmer for 2-3 minutes and let the Paneer soak in all the flavors. Turn off the heat. 

Drizzle remaining heavy cream or malai on the top before serving this palatable Restaurant style Shahi Paneer warm with Paratha, Naan or Rice.


Additional Notes - 

I used homemade Paneer with fresh herbs in it to infuse more flavors to it. You can use plain Paneer instead, without compromising on the taste.

I have used Jeera/Cumin seeds here, you can also use Shahi Jeera (Caraway seeds) to add an earthy royal touch to the curry.

Since this is Shahi Paneer, it is a great idea to add other nuts if you have them handy. Instead of using only cashews, you can use half soaked almonds and half cashews.

Add Garam masala powder to the curry if you don't have whole spices as mentioned in the recipe.

Add Sugar only if Tomatoes are sour otherwise skip it.

You can avoid using butter completely. Instead simply use the same amount of Ghee (Clarified butter). It is a healthier option. 

To make this recipe Jain, avoid using Onions and Garlic. Add Capsicum/ Green bell pepper instead to the Curry.