Showing posts with label Indian. Show all posts

Tuesday, March 9, 2021

Methi na Gota - Savory Indian snack

Prepare this quick and easy Methi na Gota and savor the flavors of fresh Methi!

Methi na Gota is a famous Indian snack that has its roots in Gujarat - a western Indian state. It is usually prepared during winters when Methi (Fenugreek) leaves are available in abundance. Methi na Gota is not only prepared in almost every household in Gujarat but also sold by many snack shops during winter. Eating fried Gota right out of the hot kadhai is such a divine experience. Hence, I try to prepare them whenever I can find fresh Methi (Fenugreek) leaves here in USA. 

What are Methi na Gota?

Methi na Gota are deep fried snack prepared using besan/gram flour, Methi/fenugreek leaves and spices along with some other ingredients. Batter is prepared by combining all the ingredients and then Gota are fried in a kadhai. Methi na Gota are crispy from outside and soft & soft from inside. If you like to avoid frying the Gota, appam/paniyaram pan can be used to prepare them. However, the taste and texture will not be same as the fried ones. You can serve Methi na Gota as appetizers or as evening snack with chai, yellow besan chutney, fried green chilies or yogurt.

 
Methi (Fenugreek) leaves -

Dense in nutrients like Vitamins A, B2, B3, B6, C, K and minerals such as folic acid, calcium, magnesium among others - Methi (Fenugreek) leaves have some amazing health benefits. According to sources, Methi leaves can help control diabetes, reduce cholesterol, reduce blemishes, reduce heart problems and provide many more health benefits. There are many ways to add Methi leaves to your diet. Apart from making Methi na Gota, I usually prepare Methi na dhebra, Methi vada, Aloo methi sabji, Methi matar malai, Methi chaman or just stir fried Methi leaves. Any dish prepared using Methi leaves tastes just delicious, so no need to think twice before preparing any Methi delights. 


Important notes/tips - 

  • Be sure to add sooji/samolina flour to prepare the Gota, as it will help make the Methi na Gota crispier. 
  • Sugar is needed to cut bitterness of Methi, so don't skip it. 
  • Fruit salt/ Eno is very important for this recipe as it causes the flour to rise which will help make soft Gota. You can use baking soda or yogurt as a substitute for fruit salt/Eno. 
  • Red chili powder, green chilies or black pepper powder can be added for spiciness in Gota. Use them in combination or either one of them per your convenience and taste. 
  • Kasuri methi is optional to this recipe but it really gives that extra kick of flavor to Methi na Gota. 

Methi Na Gota


Prepare time - 20 minutes

Cook time - 10 minutes

Serves 4 

Ingredients

1 Cup Besan/ Gram flour 

2 Tbsp Sooji/ Samolina flour

1 Cup Methi/ Fenugreek leaves (Rinsed and roughly chopped)

1/2 Cup Cilantro/Coriander leaves (Rinsed and roughly chopped)

2 Tsp Sugar

1/2 Tsp Red chili powder

1/4 Tsp Turmeric powder

1/2 Tsp Kasuri methi (optional)

1/4 Tsp Dry coriander seeds (Crushed)

Serrano pepper to taste (optional, roughly chopped)

Salt to taste

1 Tsp Eno/ Fruit salt

3/4 Cup water (as needed)

2 Tbsp hot oil 

Oil to fry 


Instructions

  1. In a large mixing bowl, first add besan/gram flour, sooji/samolina flour, crushed dry coriander seeds, kasuri methi, sugar, chopped green chili, turmeric powder, red chili powder and salt. Combine all the spices well with the flour. Next, add chopped cilantro and chopped methi/fenugreek leaves. Combine the leaves with spiced flour mixture. 
  2. Now to make batter, start adding water in the batter. First add 1/2 cup water and mix well. After that, add little water (up to 1/4th cup water) at a time to make thick batter. Cover and let the batter rest for 10 minutes.
  3. In the meanwhile, heat up oil at a medium flame in a kadhai for frying. Also, prepare a bowl with paper towels to absorb extra oil after frying Gota. After about 10 minutes, check if the oil is hot enough for frying. Drop a little batter into the oil, if it sizzles and rises up to the surface immediately, our oil is ready for frying. 
  4. Take a spoon and add hot oil to the prepared batter. Combine it well with the batter until the oil is absorbed in the flour as shown in the video. 
  5. Finally add fruit salt/Eno to the batter and quickly mix it in the batter. You will notice that the flour will become light and airy. That's the perfect batter to make our Methi na Gota soft. 
  6. We will fry Methi na Gota at medium flame to make sure they are cooked evenly. Now take handful of batter and plop it carefully in the hot oil using your thumb to cut it out. Alternatively, you can use a spoon to drop Gota in the oil. Drop about 6-8 gota (or as many as you can fit in your kadhai but do not crowd it) into the hot oil. Fry them for about 2 minute and turn them around using skimmer or spider strainer. Let the Gota fry on the other side for another 1-2 minutes. 
  7. Remove Methi na Gota from oil once they turn crispy and become golden brown. Soft and fluffy from inside and crispy from outside Methi na Gota are ready to devour. Serve them immidiately with fried chilies or yogurt. 

Sunday, July 19, 2020

Restaurant style Shahi Paneer (The Royal Cottage Cheese)


Shahi Paneer is one of the most popular North Indian Paneer delicacies made in India. Shahi Paneer literally means the Royal Cottage Cheese. Though it is known as North Indian curry, this curry has its roots in Mughlai cuisine. The name comes from the richness and flavors of the gravy that the Paneer is prepared in. The richness and creaminess of the gravy comes from the use of cashews, cream (malai), tomatoes and onions, while the flavors come from the use of whole spices. The thick creamy gravy can easily leave one craving for more! Whenever I make this delish curry at home, I make some extra gravy so that we can devour the gravy with Parathas or rice. 


Since we are talking about Shahi Paneer and its richness, it naturally brings us to think if this is a healthy meal that you would like to prepare for the family. So let me tell you, Shahi Paneer may not be a dish that you would like to prepare for your daily diet but this is definitely a show stellar if you are preparing it for an occasion or for a weekend treat. Moreover, you could make this dish healthier if you take certain measures like using Ghee (Clarified butter) instead of butter or substitute some of the cream with yogurt. Also, I avoid frying Paneer which saves us from a lot of unwanted fats and calories. You can serve the curry with whole wheat Roti, Paratha or naan (what I usually do) instead of rice or white naan (made from maida/all purpose flour). 


Oh and let's also review some health benefits of the ingredients. Paneer is freshly made cheese by curdling milk and is an excellent source of proteins, calcium, selenium and potassium. Paneer also contains Omega 3 and Omega 6 fatty acids that helps strengthen your bones and teeth. Thus, it is very important for vegetarians who do not get sufficient intake of these nutrients from eating meats or eggs. I usually try to prepare Paneer at home rather than buying from the store. It is very easy to prepare, as it takes only a few minutes to make it and is free of preservatives. On the other hand, the whole spices used to make the gravy help with digestion along with providing a lot of health benefits including anti-diabetic and anti-inflammatory benefits. So here's the rich and healthy dish to please your palate for an occasional retreat...

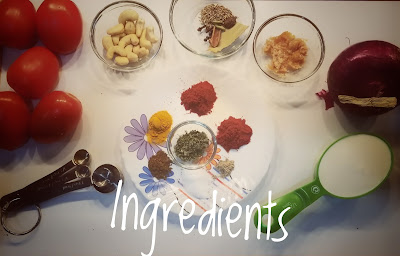
Let's start from gathering ingredients for this restaurant style Shahi Paneer. 

Ingredients  (Serves 4)
Prepare time - 15 minutes
Cook time - 35 minutes


5 Medium tomatoes
1  Large Onion 
1 1/2 Tbsp Ginger Garlic paste
200 - 250 gm Paneer 
1/2 Cup Heavy cream/ Malai
10-12 Pcs Cashew
1 Tsp Jeera (Cumin seeds)
3 Cloves
1 Cinnamon stick 
2 Pods Green cardamom 
1 Pod Black cardamom 
4-5 Peppercorn 
1 Bay leaf
1 Tbsp Kasoori methi
1 Tbsp Kashmiri red chilli powder (divide into 2 parts)
1 Tsp Turmeric powder
1 Tsp Garam masala powder (optional)
1/2 Tsp Sugar (optional - use if tomatoes are sour)
1/4 Tsp Cardamom powder 
1 Tbsp Oil 
1 Tbsp Ghee (Clarified butter)
2 Tbsp Butter
1/2 Cup Water
Salt to taste

Let's begin cooking...

Take a big saucepan or kadhai and heat up Ghee and Oil at a medium to high flame. 


Roughly chop tomatoes and onions; add them to the saucepan. Lightly saute for 1 minute on a medium flame without turning the onions brown.


Now add Ginger garlic paste and mix it well. Saute for another minute or two until the raw smell of garlic is gone. 


Next add all the whole spices including Jeera, Cloves, Cinnamon, Green cardamom, Black cardamom, Peppercorns and Bay leaf  along with Cashew pieces. Mix it well.


Add powdered spices including Garam Masala (if whole spices in above step are not added), half of the Kashmiri red chilli powder, and Turmeric powder.


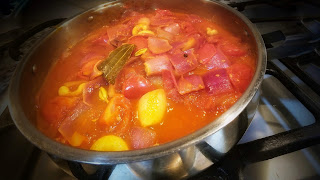
Add water and cover the pan or kadhai with a lid. Let this mixture cook for about 20 minutes at a medium flame while stirring occasionally.


Now turn off the heat and remove all the whole spices. I removed Cloves, Cinnamon, Green cardamom, Black cardamom, Peppercorns and Bay leaf. But you can leave black Peppercorns in, if you like to make it little more spicy. 


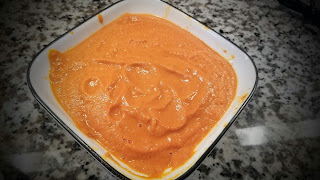
Let the mixture cool down completely before adding everything to the the blender. Blend everything into a smooth gravy. 


Take a big strainer and sieve the gravy into a bowl, this step is essential to make silky smooth gravy. Discard the residue.


Now heat up a saucepan or kadhai and add butter. When melted, add remaining Kashmiri red chilli powder. Give it a quick stir, don't let it burn. 


Immediately add sieved gravy to the saucepan and mix well. 


Now add Heavy cream/ malai (leaving some aside for garnishing), Cardamom powder and Kasoori methi powder to the gravy, stir it well. Kasoori methi is a must in any North Indian recipe.. don't skip it. 


It's time to add the main ingredient of the dish that defines the curry - Paneer. Add cubed Paneer pieces and gently mix everything without breaking the Paneer cubes. 


Cover and simmer for 2-3 minutes and let the Paneer soak in all the flavors. Turn off the heat. 

Drizzle remaining heavy cream or malai on the top before serving this palatable Restaurant style Shahi Paneer warm with Paratha, Naan or Rice.


Additional Notes - 

I used homemade Paneer with fresh herbs in it to infuse more flavors to it. You can use plain Paneer instead, without compromising on the taste.

I have used Jeera/Cumin seeds here, you can also use Shahi Jeera (Caraway seeds) to add an earthy royal touch to the curry.

Since this is Shahi Paneer, it is a great idea to add other nuts if you have them handy. Instead of using only cashews, you can use half soaked almonds and half cashews.

Add Garam masala powder to the curry if you don't have whole spices as mentioned in the recipe.

Add Sugar only if Tomatoes are sour otherwise skip it.

You can avoid using butter completely. Instead simply use the same amount of Ghee (Clarified butter). It is a healthier option. 

To make this recipe Jain, avoid using Onions and Garlic. Add Capsicum/ Green bell pepper instead to the Curry.