Showing posts with label Vegetarian. Show all posts

Tuesday, March 9, 2021

Methi na Gota - Savory Indian snack

Prepare this quick and easy Methi na Gota and savor the flavors of fresh Methi!

Methi na Gota is a famous Indian snack that has its roots in Gujarat - a western Indian state. It is usually prepared during winters when Methi (Fenugreek) leaves are available in abundance. Methi na Gota is not only prepared in almost every household in Gujarat but also sold by many snack shops during winter. Eating fried Gota right out of the hot kadhai is such a divine experience. Hence, I try to prepare them whenever I can find fresh Methi (Fenugreek) leaves here in USA. 

What are Methi na Gota?

Methi na Gota are deep fried snack prepared using besan/gram flour, Methi/fenugreek leaves and spices along with some other ingredients. Batter is prepared by combining all the ingredients and then Gota are fried in a kadhai. Methi na Gota are crispy from outside and soft & soft from inside. If you like to avoid frying the Gota, appam/paniyaram pan can be used to prepare them. However, the taste and texture will not be same as the fried ones. You can serve Methi na Gota as appetizers or as evening snack with chai, yellow besan chutney, fried green chilies or yogurt.

 
Methi (Fenugreek) leaves -

Dense in nutrients like Vitamins A, B2, B3, B6, C, K and minerals such as folic acid, calcium, magnesium among others - Methi (Fenugreek) leaves have some amazing health benefits. According to sources, Methi leaves can help control diabetes, reduce cholesterol, reduce blemishes, reduce heart problems and provide many more health benefits. There are many ways to add Methi leaves to your diet. Apart from making Methi na Gota, I usually prepare Methi na dhebra, Methi vada, Aloo methi sabji, Methi matar malai, Methi chaman or just stir fried Methi leaves. Any dish prepared using Methi leaves tastes just delicious, so no need to think twice before preparing any Methi delights. 


Important notes/tips - 

  • Be sure to add sooji/samolina flour to prepare the Gota, as it will help make the Methi na Gota crispier. 
  • Sugar is needed to cut bitterness of Methi, so don't skip it. 
  • Fruit salt/ Eno is very important for this recipe as it causes the flour to rise which will help make soft Gota. You can use baking soda or yogurt as a substitute for fruit salt/Eno. 
  • Red chili powder, green chilies or black pepper powder can be added for spiciness in Gota. Use them in combination or either one of them per your convenience and taste. 
  • Kasuri methi is optional to this recipe but it really gives that extra kick of flavor to Methi na Gota. 

Methi Na Gota


Prepare time - 20 minutes

Cook time - 10 minutes

Serves 4 

Ingredients

1 Cup Besan/ Gram flour 

2 Tbsp Sooji/ Samolina flour

1 Cup Methi/ Fenugreek leaves (Rinsed and roughly chopped)

1/2 Cup Cilantro/Coriander leaves (Rinsed and roughly chopped)

2 Tsp Sugar

1/2 Tsp Red chili powder

1/4 Tsp Turmeric powder

1/2 Tsp Kasuri methi (optional)

1/4 Tsp Dry coriander seeds (Crushed)

Serrano pepper to taste (optional, roughly chopped)

Salt to taste

1 Tsp Eno/ Fruit salt

3/4 Cup water (as needed)

2 Tbsp hot oil 

Oil to fry 


Instructions

  1. In a large mixing bowl, first add besan/gram flour, sooji/samolina flour, crushed dry coriander seeds, kasuri methi, sugar, chopped green chili, turmeric powder, red chili powder and salt. Combine all the spices well with the flour. Next, add chopped cilantro and chopped methi/fenugreek leaves. Combine the leaves with spiced flour mixture. 
  2. Now to make batter, start adding water in the batter. First add 1/2 cup water and mix well. After that, add little water (up to 1/4th cup water) at a time to make thick batter. Cover and let the batter rest for 10 minutes.
  3. In the meanwhile, heat up oil at a medium flame in a kadhai for frying. Also, prepare a bowl with paper towels to absorb extra oil after frying Gota. After about 10 minutes, check if the oil is hot enough for frying. Drop a little batter into the oil, if it sizzles and rises up to the surface immediately, our oil is ready for frying. 
  4. Take a spoon and add hot oil to the prepared batter. Combine it well with the batter until the oil is absorbed in the flour as shown in the video. 
  5. Finally add fruit salt/Eno to the batter and quickly mix it in the batter. You will notice that the flour will become light and airy. That's the perfect batter to make our Methi na Gota soft. 
  6. We will fry Methi na Gota at medium flame to make sure they are cooked evenly. Now take handful of batter and plop it carefully in the hot oil using your thumb to cut it out. Alternatively, you can use a spoon to drop Gota in the oil. Drop about 6-8 gota (or as many as you can fit in your kadhai but do not crowd it) into the hot oil. Fry them for about 2 minute and turn them around using skimmer or spider strainer. Let the Gota fry on the other side for another 1-2 minutes. 
  7. Remove Methi na Gota from oil once they turn crispy and become golden brown. Soft and fluffy from inside and crispy from outside Methi na Gota are ready to devour. Serve them immidiately with fried chilies or yogurt. 

Friday, February 5, 2021

Mediterranean Chickpeas salad with Tahini dressing


Have you been struggling to eat salads like me? I love salads as a side but it is difficult for me to eat them as a meal. I like cooked food more over raw vegetables to feel satisfied. If I have an option, I would choose soup over salad to eat healthy.  However I feel that sometimes salads can provides an array of flavors and textures that can't be found in soups. Therefore, I have been trying to come up with the salad that I can enjoy as a meal and this Mediterranean Chickpeas Salad is just what I needed. It is a perfect blend of vegetables, flavors and cooked spiced chickpeas! Needless to mention, this salad is my perfect balanced meal that is rich in nutrients, fibers and protein. 

The Mediterranean Chickpeas Salad is refreshing and very simple to prepare. The recipe is very flexible as far as the blend of vegetables that can be used to prepare it. But the two star ingredients of this salad are the spiced chickpeas and the tahini dressing. These two are a must to enjoy that delicious tasting Salad. 

Vegetable blend -

I have used fresh baby spinach, baby cucumbers (Turkish cucumbers), avocado, cherry tomatoes and parsley. But if you don't have these veggies, here are some fresh veggies that goes well with this salad - broccoli, green or red bell peppers, red onions, corn kernels, kalamata olives, etc. For leafy greens, you can try arugulas, baby lettuce or chard. Also, you can use chopped roma tomatoes if you can't find cherry tomatoes. 


Chickpeas - 

In an effort to save time I have used canned chickpeas but you can also use dried chickpeas. Just soak the dried chickpeas overnight and pressure cook for 2-3 whistles. Just remember to not overcook them as we don't want to mash them. 


Tahini -

As I mentioned earlier, tahini dressing is very important for this recipe. So, try to find store brand Tahini to save time. You can also prepare it at home easily, it refrigerate well for up to 2 weeks. 


Mediterranean Chickpeas Salad with Tahini dressing


Prepare time -15 minutes
Serves - 2

Ingredients

Salad vegetables

1 Large Avocado cubed
2 Cup Baby Cucumber diced
8-10 Cherry tomatoes halves
1 Cup Baby spinach
1/4 Cup Parsley finely chopped
1/4 Cup Red onion thinly sliced (optional)

Tahini dressing 

1/4 Cup Tahini
2 Tbsp Extra-virgin olive oil
1/4 tsp Black pepper powder, to taste
1/2 tsp cumin powder
1 Medium Lemon
1 Tbsp Maple syrup or honey
2 tablespoons water, more as needed
Salt to taste

Spiced Chickpeas

1 Can (16 oz) chickpeas drained and rinsed (1 1/2 Cup boiled Chickpeas)
1 Tbsp Olive oil
1/4 Tsp Cumin powder
1/4 Tsp Black pepper powder, to taste
1/4 Tsp paprika
Salt to taste 

Instructions

Begin by heating up a pan on medium flame and add olive oil. Add drained and washed chickpeas along with the remaining ingredients listed under Spiced Chickpeas. Combine well and cook the chickpeas for 3-5 minutes. 

Turn off the flame and transfer the Spiced Chickpeas to a bowl. Keep it aside.

Now in a small mixing bowl, add all the ingredients listed under Tahini dressing except lemon and water. Squeeze in the lemon juice and whisk everything together until well combined. Add 1 or 2 tablespoon of water for better consistency of the dressing. Keep the Tahini dressing aside.

Finally in a big mixing bowl, add all the vegetables listed under Salad vegetables followed by the Spiced Chickpeas and Tahini dressing. Combine everything well so all the ingredients of the salad are nicely coated with the dressing. 

Serve this deliciously blended Mediterranean Chickpeas Salad in a big Salad bowl or a plate and enjoy your meal! :)


Thursday, January 21, 2021

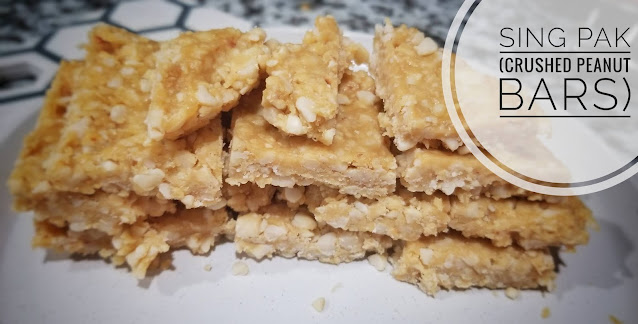
Sing pak (Crushed peanut bars) with jaggery


Sing pak or crushed peanut bar is my childhood favorite winter goodie that my mom prepared for us every year in winter. Mostly people either prepare this delight at home but you can easily buy it from the street side vendors or local grocery stores. Sing pak is prepared specially around the festival of Uttarayan or Makar Sankranti when Sun enters into Makar rashi (Capricorn zodiac) - moves northwards - indicating end of winter and beginning of spring season. It is also called a harvest festival and is celebrated across India. 

It is very easy and simple to prepare Sing pak (Crushed peanut bar) with just 3 ingredients - peanuts, jaggery and ghee or coconut oil. These ingredients boost immunity and help our body fight against changing season. Sing pak is protein rich and provides energy to keep up with change in the season. I have seen sometimes people add dried ginger powder or cardamom powder to it but I just love the original plain Sing pak without any add-ons. Sing pak (Crushed peanut bar) can be a healthier snacking option for kids and adults. Once you learn how to prepare the Sing pak, you can prepare the same using any type of nuts like cashews or almonds. 

What is Sing pak?

Sing pak is a winter delicacy from Gujarat, where Sing is a Gujarati word for peanuts and pak is something very close to a texture like fudge. Sing pak is completely different in texture from Sing chikki. Sing pak has texture like fudge that is hard enough to hold together peanuts and jaggery but easy to break and bite on it without much efforts. While Sing chikki has a texture like brittle or candy. 

Jaggery vs Sugar?

Sing pak can be prepared using either jaggery or sugar. However, using jaggery is not only healthier but also more nutritious and of course it tastes so much better in my opinion. Even though jaggery and sugar both have same amount of calories, jaggery is rich in iron, magnesium and potassium. To prepare Sing pak (Crushed peanut bars), you just need to learn how to obtain the correct texture for jaggery. 


Sing pak - Crushed Peanut bar


Prepare time - 10 minutes
Cook time - 5 minutes
Yields - 10 to 12 squares

Ingredients

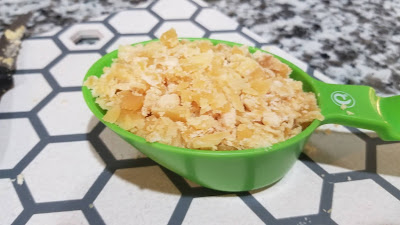
3/4 Cup Raw Sing/Peanuts (blanched)
1/2 Cup Gol/Gur/Shaved/powdered Jaggery
2 Tbsp Ghee or Coconut oil 

Instructions

Begin with greasing a tray or a plate with high rims with some ghee. 

Now roast peanuts in a kadhai or heavy bottom pan on a medium heat. Be sure to stir peanuts frequently to evenly roast them without burning them. After 2-3 minutes, you will notice brown spots on peanuts, indicating peanuts have turned crisp and you can easily remove the skin (if using peanuts with skin). Turn off the heat and transfer the peanuts in a plate. 

Once the peanuts cool down a little, take a paper towel or cloth napkin and rub the peanuts to remove skin easily. This is just one additional step to perform if using unblanched peanuts. 

Now, add the blanched roasted peanuts in a blender and grind them in pulses. This will ensure the oil from peanuts does not separate. Transfer the crushed peanuts in a bowl. 

Next heat up the same kadhai or heavy bottom pan and add ghee. Once ghee is melted, add shaved or powdered jaggery to it. Once jaggery start melting, it will turn bubbly and mix well with ghee. Be sure to stir jaggery frequently so that it melts evenly. 

Quickly turn off the heat and add crushed peanuts to jaggery. Combine jaggery and peanuts well and transfer the mixture to greased plate. Spread and flatten the Sing pak with the help of a flat bottom bowl or spatula. Alternatively, you can place parchment or butter paper on top and spread it by rolling pin. 

Mark the lines on Sing pak (Crushed peanut bars) using knife while it is still warm. 

Allow Sing pak (Crushed peanut bars) to cool down completely before cutting into pieces. Store in airtight container and enjoy this winter goodie! 


Wednesday, January 13, 2021

Wholesome Buddha Bowl with Quinoa and Tofu


The holiday season here in America is over and so now I am trying to get back to eating healthier food. Healthy food does not mean cutting out on tasty food but instead eat food with more nutritional value that can help me stay fit. So lately I cut down on the intake of white rice and white pasta and replaced with quinoa, brown rice, ancient grains and whole wheat pastas, millets and whole wheat flours and off course ton of veggies. So in my quest of eating more wholesome food, I have started preparing various different nutritious Buddha bowls. They are perfect for either lunch or dinner and keep us fuller longer. 

What is Buddha bowl?

There are different versions of the story but according to one of them, Buddha bowl literally came from Buddha's bowl that he carried with him while on his journey to enlightenment. He would gather the vegetarian food in a bowl that the villagers offered to him and eat it at the end of the day. This vegetarian dish is served in a large bowl or a plate with high rims. It can have various elements of well balanced meal ranging from grains like quinoa or rice, protein such as Tofu, beans or paneer, vegetables of choice either steamed, roasted or raw and fruits of choice, etc. 

My family loves Buddha bowl especially when I add some Tofu or paneer to it. 

How to press Tofu?

Tofu is one difficult ingredient that is tricky for many people to handle. Also, not everyone is a fan of the texture of the Tofu. But you can say that I have been blessed in that respect as my family just like to eat tofu in any shape or form I prepare it. With that being said, we all love the crispy baked/air-fried tofu the most! In order to get the delicious crispy tofu, follow these steps:

1. Get firm or extra firm tofu from the store. 

2. Press it using Tofu-press for about 20 minutes. Alternatively, place Tofu block in a flat bottom strainer and press it with heavy weight plate on it for at least an hour. You can press Tofu beforehand to save some time on the day of preparing Buddha bowl.


3. Sprinkle your choice of spices and oil and bake the cubed tofu in the oven.


Roasted Veggies 

For this recipe I have used beetroots, baby carrots and bell pepper but you can use any vegetables of your choice, such as broccoli, sweet potatoes, cauliflower or mushrooms.

Beans

Beans are actually optional if adding protein like tofu in your bowl. But I love to have different textures in my bowl, so I added pinto beans. You can also use chickpeas or kidney beans. 

Grains

I have used quinoa in the recipe, but you can use any variation of rice, couscous or even mix of ancient grains as per your preference. 

Fresh salad and fruits

I had cherry tomatoes on hand but cucumber, cabbage or avocadoes could be used instead.  Also, feel free to include or exclude fresh fruit in the bowl. But they will definitely add some flavor to your dish. 


Wholesome Buddha Bowl with Quinoa and Tofu

Prep time - 30 minutes
Cook time - 35-40 minutes
Yields - 3 to 4 servings


Ingredients

For Cilantro lime quinoa:

1 Cup dried Quinoa rinsed and washed

1 1/2 Cup Water 

2-3 Tsp freshly squeezed Lemon juice

Handful of Cilantro rinsed and chopped

1/2 Tsp Olive oil

Salt to taste

For Pinto beans with Spinach:

1 Can Pinto beans - 16 oz rinsed and washed

1 Cup Baby spinach rinsed

1 Tsp Olive oil

1/4 Tsp Black pepper powder

1/4 Tsp Cumin powder

Salt to taste

For Roasted Veggies:

1 Cup Beets peeled and cubed

1 Cup Colorful bell peppers washed and diced

1 Tbsp Olive oil 

1/4 Tsp Black pepper powder

1/4 Tsp Cumin powder

Salt to taste

For Tofu + marinade:


1 Block of Extra Firm Tofu - 16 oz pressed and cubed

1 Tbsp toasted Sesame oil

2 Tsp Soy sauce

1 Tsp Siracha sauce (add more for spicier taste)

1 Tsp Maple syrup

Fresh fruits and veggies:

1/2 Cup fresh Cherry tomatoes rinsed 

2-3 Fresh Orange cubed or Fresh fruits of your choice 

Instructions:

  1. Preheat oven to 350F.
  2. In a medium bowl, add all the ingredients for marinade and combine well. Now add cubed tofu to the bowl and coat them evenly in marinade. Let the tofu marinate until we work on the remaining elements of the bowl.
  3. Now line the baking tray with foil and place all the veggies - beets, carrots and bell peppers on the baking tray. Drizzle olive oil and sprinkle black pepper powder, salt and cumin powder on the veggies. Mix well and roast in the oven for 15-17 minutes. 
  4. While the veggies are roasting, let's prepare Cilantro Lime Quinoa. Take quinoa in a bowl and wash them well, until the water runs clean. Now add quinoa, water, salt and olive oil to the Instant pot to cook them for 1 minute on manual high pressure and let the pressure release naturally.  
    • Alternatively, you can cook quinoa in a big pot on the gas stove. Boil 5-6 cups of water, add quinoa and cook them for about 10-12 minutes. Drain any excess water and place quinoa back in the pot. 
  5. Add chopped cilantro and lemon juice to quinoa and mix everything well. Taste check quinoa to adjust salt as needed and transfer Cilantro lime quinoa to a bowl. 
  6. Rinse clean the inner pot and place it back in the IP. Turn on the sauté mode and heat up olive oil. Add pinto beans and baby spinach to the pot along with the black pepper powder, cumin powder and salt. Mix everything well. 
  7. Cook until baby spinach leaves are wilted. Be sure to stir the beans and baby spinach frequently to avoid any burning at the bottom of the pot. Transfer everything to a separate bowl. 
  8. When the roasted veggies are ready, transfer them to a bowl and replace the foil if needed. Do not turn off the oven at this point as we will need to bake tofu in it. 
  9. Line the marinated tofu cubes on the baking sheet evenly, leaving some space between each cube for it to bake properly. 
  10. Place the marinated tofu tray in the oven and bake at 350F for 15 minutes. Remove the crispy baked tofu cubes from the oven when done. 
  11. Arrange all the elements - cilantro lime quinoa, crispy baked tofu, roasted veggies, pinto beans, fresh cherry tomatoes and orange cubes - of the Buddha bowl in a plate or in a bowl. Sprinkle some sesame seeds on top and drizzle some of the remaining tofu marinate liquid or hot sauce to add more flavors. 
  12. Enjoy the delicious flavorsome wholesome Buddha bowl! 


Thursday, November 12, 2020

Black Forest Shrikhand Trifle


Diwali is just around the corner followed by Thanksgiving and Christmas. There will be lots of reasons to celebrate the festivals this year as we all aim for better and brighter tomorrow. We will have reasons to be thankful this year to be able to survive the biggest pandemic of the century. And as we look ahead we will cherish the memories of yesterdays. As we celebrate the festival of Diwali or as they say festival of lights, we will pray to God to spread the light of joy and happiness in our lives. What better way to celebrate these amazing festivals than with a fusion dessert that tells you a tale of yester years with the flavors of present times.

What is Shrikhand?

Shrikhand is a Western Indian dessert that is now widely known to many as it is sold in almost all Indian stores across the globe. Traditionally Shrikhand is prepared with hung curd and flavored with either Elaichi (Cardamom) powder, kesar (Saffron) & Pistachios or Mango pulp. It is very easy to prepare Shrikhand as it requires only 2 ingredients - Hung curd and sugar, plus flavoring of your choice. 

Here I have given this traditional dessert a little twist by flavoring it with non-Indian flavors of Maraschino cherries and chocolate inspired from the Black Forest cake. The delicate cherry flavor when combined with the creamy chocolate flavor is so decadent that this dessert will be a big hit for your party or family gathering. This delicious and fancy dessert is very easy to prepare with just a few ingredients. The best part is you can prepare this dessert a day or two in advance and there will be one less thing to worry about on the day of your gathering. 

What is Trifle?

Trifle is a traditional English/British dish that has layers of savory or sweet flavors. When prepared as sweet dessert, Trifle is prepared with thin layers of various fruit flavors, custard, sponge soaked in wine and cream. Trifle is a versatile dessert as you can mix and match your choice of flavors and textures. 

Just in case if you are wondering, we are not going to talk about about health benefits today as we are talking about desserts and holiday season! You can let it loose once in a while. :)


Tips and tricks - 

  • Traditionally Shrikhand is prepared with hung curd but I have used Greek yogurt here as I had it on hand and it saves a lot of time. If you are using homemade yogurt, just sieve it in a muslin cloth, tie it tight and rest the cloth on a strainer. Let it rest for couple hours so all the excess water drips down. 
  • I have used store bought jar of Maraschino cherries. The cherries are stored in a sugar syrup which I like as I don't have to prepare sugar syrup separately. Also, the jar of cherries is always available in store, so I can prepare this delicious dessert any time of the year! 
  • You can also use fresh cherries instead. Just be sure to use pitted cherries and prepare cherry sugar syrup by boiling cherries with water and sugar. 
  • For the crust, I have used Parle-G as that's what I had available at the time. Feel free to use any other plain cookies or graham crackers. 
  • Here I have used almond butter to add some nutty flavor. You can use any nut butter that is available to you. 
  • With the ingredients listed below, I was able to prepare 6 cups of Trifle but I have shown only 4 cups to keep it clear in the video. 
  • Always use bone char free granulated cane sugar to keep this recipe vegetarian. 
  • Although I have not tried it, but you can use non-dairy yogurt to make this a vegan dessert.

Black Forest Shrikhand Trifle


Prepare time - 30 to 35 minutes

Refrigerate time - 4 to 6 hours or overnight

Yields - 6 servings


Ingredients


2 pack of Parle-G or graham crackers (160 gm)

2 Tbsp Almond butter 

8-10 Maraschino cherries for topping 

For Cherry Shrikhand 

1 Cup Greek yogurt or hung curd

1/2 Cup Sugar (adjust per taste)

1/4 Cup Maraschino cherries chopped

2-3 Tbsp Sugar syrup from the preserved maraschino cherries

Chocolate Shrikhand

1/2 Cup Greek yogurt or hung curd

1/2 Cup Sugar

3 Tbsp Cocoa powder

2 Tbsp Chocolate chips

1 Tsp Vanilla extract (optional)


Instructions


Let's begin by first transferring the cookies to a ziplock bag. Now, crush the cookies using rolling pin as shown in the video. Do not powder the cookies completely.

Now, melt the almond butter in a microwave for about a minute. Add it to the crushed cookies and combine well. 

Add 2 tbsp of crushed cookie mixture to each cup and press it down using an empty cup or a spoon. Now, place the cups in the refrigerator for 5 minutes until we prepare Cherry Shrikhand. 

To prepare Cherry Shrikhand, begin with roughly chopping the cherries except the ones that we separated for garnishing at the end. 

Now, take Greek yogurt in a mixing bowl. Add sugar and combine well. Next, add the chopped cherries (keep 1 tbsp cherries aside) and cherry syrup to the yogurt mix. Whisk well to get creamy pink Cherry Shrikhand. 

Now, take out the dessert cups from the refrigerator. Add a layer of Cherry Shrikhand by adding 2 tbsp each to a cup. Top them with some chopped cherries that we kept on a side. Place the cups in a refrigerator for another 5 minutes. 

Remove the cups from fridge and add another layer of crushed cookie mixture - 1 Tbsp per cup. Place the cups back in the refrigerator to settle as we prepare next layer. 

To prepare Chocolate Shrikhand, mix in remaining Greek yogurt, sugar, cocoa powder and vanilla extract in a mixing bowl. Whisk well to get delicious creamy Chocolate Shrikhand. 

Remove the dessert cups from refrigerator and add a layer of Chocolate Shrikhand - 1.25 Tbsp per cup. Top with some chocolate chip cookies. 

Place the cups back in the fridge for 5 minutes. Remove cups from fridge and add 1 tbsp Cherry Shrikhand layer in each cup. At the end garnish the yummylicious dessert cups with couple cherries that we kept aside. 

Finally, cover each dessert cup with cling wrap and refrigerate for 4-6 hours or overnight to settle completely. It also helps mingle the flavors. You can prepare these delicious Black Forest Trifle cups as many as 2 days in advance and they will taste just as amazing on the day of your party or gathering! 


Thursday, November 5, 2020

Baked Butternut Squash Pasta


Fall is the season of colors and marks the beginning of the Holiday season. I absolutely love the fall colors and what better way to celebrate the season than to bring out the beautiful colors on a plate. This baked Butternut squash pasta with sautéed vegetables is my humble effort to celebrate the colors of the season. This bright and beautiful dish has smooth and creamy texture that complements the lightly sautéed and crunchy fall color veggies. This pasta dish is a complete meal and a delightful surprise for your friends and family this holiday season! 

This pasta is prepared with my favorite butternut squash that is so versatile that I prepare a different dish with it every time I bring it home. I have prepared soups, crisps, desserts and sometime I just add the chunks to my quinoa or rice dish. This time I have prepared pasta sauce with it. The sauce can be used to prepare not only this delicious baked pasta recipe but can also be used to prepare lasagna. Either way it will please your taste buds and will be loved by all. I have also added a surprise element in this pasta by sneaking in some fresh and juicy pineapple chunks in the sauce. The sweet pineapple brings out the best flavor of this fall favorite pasta. 


The Baked butternut squash pasta dish is vegetarian and egg-free. You can easily turn it into vegan dish by adding some vegan cheese or nutritional yeast. 

So let's get started...

Important notes/ tips

  • Butternut squash is very hard to slice through, so please use sharp knife that is big enough for the size of the squash. Refer to the recipe video to see the cutting process. 
  • I have used an entire medium size butternut squash for this recipe, you can adjust the quantity depending on the size of the squash. 
  • It is recommended to use fresh pineapple chunks but canned chunks can also be used. 
  • I have topped this pasta with some vegetarian parmesan cheese. But you can easily make this dish vegan by either skipping the parm cheese or topping the pasta with some nutritional yeast. 
  • Turn this dish to gluten free by replacing the regular penne pasta with gluten free pasta of your choice. 
  • I have used penne pasta for the recipe but you can use any other cylindrical shaped pasta. This would allow the creamy sauce to get inside the pasta and give an oozing result bursting with the sauce. 

Baked Butternut Squash Pasta


Prepare time - 15 minutes

Cook time - 1 hour 15 minutes

Serves - 4 to 6 

Ingredients 

2 Cup dry/uncooked Penne pasta 

1 Medium Butternut squash

1 Large carrot

1 Cup fresh Pineapple chunks

1/2 Medium white onion

3-4 Garlic cloves

1/3 Cup Parmesan cheese 

1/2 Cup Breadcrumbs 

2 Tbsp Vegenaise (optional)

2 Cup Water 

3 Tbsp Olive oil

1 Tbsp Dried oregano

1 Tbsp Dried thyme

1/2 Tbsp Black pepper powder

Salt to taste 

Water to  cook pasta 


Instructions

Preheat oven at 425F. Cut the head of the Butternut squash and then slice the squash in circular motion into half. Scoop out the seeds with a spoon. 

Line a baking tray with silicone mat or foil and place the butternut squash halves on it. Brush olive oil on the inner side of the squash, sprinkle the dry herbs and spices on the halves. Turn the squash and brush oil on the outer side of the squash. Place the squash halves into the oven keeping the squash halves facing down. Bake for 45 minutes. 

While squash is baking, prepare the pasta. Add dry pasta in IP and add water, oil and salt. Cook pasta in IP for 1 minute at high pressure. 

In the meanwhile, peel and dice carrot. Roughly chop onion and garlic. 

When pasta is done, quick release the pressure and drain the pasta. Transfer the pasta into a bowl.

In the same IP pot, add the remaining olive oil and turn on the sauté mode. When oil heats up, add roughly chopped onion and garlic and carrot. Add in the remaining herbs and spices and mix well. 

Sauté for 2-3 minutes and add water to the pot. Close the IP lid, set it to sealing. Switch IP mode to high pressure cook for 5 minutes. When cooking is done, let the pressure release naturally. 

Remove butternut squash from oven and check if it is soft and completely baked. Let it cool for 5 minutes. Carefully, remove the skin of baked butternut squash and chop it roughly in big chunks. Be careful if the squash is too hot. Hot steam can cause burns. Use knife to remove skin if needed. 

Open IP and add chopped butternut squash pieces to the pot. Combine well.

Puree the mixture using immersion blender. Blend until smooth pasta sauce is ready.  Now to make the sauce extra creamy, add in vegenaise to it and combine well. Further add pineapple chunks and mix everything well and keep aside. 

Preheat oven to 350F. 

In an oven safe tray, add cooked pasta and lay flat. Take half of the butternut squash pasta sauce and coat the penne pasta well. 

Now add a layer of the remaining pasta sauce on top of the coated pasta. Next, sprinkle parmesan cheese over the pasta and then generously sprinkle breadcrumbs on the top. 

Bake in the oven for 15 minutes or until you see crumbs turning golden brown. Place the pasta tray on cooling rack and let it cool down for 5 minutes before serving.

The hot and creamy Baked Butternut squash Pasta is ready to serve with sautéed vegetables.  


Thursday, October 29, 2020

Wheat (Atta) Sheera with Jaggery


As we are getting closer to the Holiday season, it's time to start preparing the holiday delights for the family. I like to kickstart the holiday season with some healthy yet delicious dessert to keep our health in check. Here's one of the most favorite dessert/ meetha of my family - Wheat (Atta) Sheera during the auspicious festival of Navratri. Wheat (atta) sheera is a famous dessert or side in Western and North India. I have prepared this decadent dessert numerous times before and it has been loved by one and all. The Gujarati style wheat (atta) Sheera is one of the easiest dessert to prepare.  

This Sheera is made with just 7 simple ingredients that are easily available in Indian household. You just need whole wheat flour, jaggery, homemade ghee, milk, cardamom pods/powder, nuts and few saffron strands. While saffron strands are optional in the recipe but they give a distinct flavor and color to the Sheera. 

Traditionally, sugar is added to this Sheera as sweetener but to avoid decking up on all the unhealthy calories, I have prepared it by using jaggery instead. Though jaggery and sugar provide almost the same amount of calories, jaggery is considered more nutritious than refined sugar. In fact according some sources, jaggery benefits our bodies in numerous ways.

I have also used milk in preparing the Sheera instead of water to make it richer  and creamier in taste. Adding milk is optional but I have always added milk to it and I absolutely love the texture and the taste of the Sheera that is prepared using milk vs water. 

So without further ado, let's look at some important notes and then the recipe. 

Important Notes/ Tips

  • It is important to use thick bottom kadhai/pan to prepare the Sheera, it will help avoid burning of ghee and wheat flour (atta).
  • It is important to roast the wheat flour (atta) correctly. Do not over roast wheat flour, else it will get burnt and under roasting will give a raw taste.
  • Jaggery need to be shaved or powdered in order for it to melt quickly when mixed with wheat flour (atta) and ghee. Adjust the quantity of jaggery as per your liking. 
  • I have used ghee prepared at home for the recipe, you can always use store bought ghee. Here is my recipe for Homemade ghee if you like to see it. You can add little more ghee if you like but do not reduce ghee quantity else the Sheera will turn sticky.
  • I have added milk to prepare Sheera, however you can use water instead, in the equal quantity, if you like to keep this recipe vegan. Also, know that adding water will give darker color to Sheera. 
  • Be sure to use room temperature or lukewarm milk for the recipe. Cold milk will act against the hot kadhai/ pan and the Sheera mixture. 
  • You can store the Sheera in a container in the fridge for up to a week. Always warm it up before serving.

Wheat (Atta) Sheera with Jaggery


Prepare time - 5 minutes

Cook time - 20 minutes

Yields - 2 1/2 Cup Sheera


Ingredients

1 Cup Wheat flour (Atta)

3/4 Cup Melted ghee

3/4 Cup Shaved/powdered jaggery (adjust the quantity per your liking of sweetness)  

1 1/2 Cup Milk 

2-3 Pods of Cardamom (Elaichi) / 1 Tsp cardamom powder

Handful of cashew halves, silvered almonds and raisins

Few strands of saffron (optional)


Instructions

Heat up a kadhai/ pan on a medium flame. Add homemade ghee to the kadhai and heat it up for 1 minute. While ghee is heating up, take saffron strands in a small bowl and add a tablespoon of milk. Let it soak. 

Now add wheat flour (atta) to the heated ghee and combine it well. Keep stirring the mixture continuously with spatula or spoon to avoid any lumps in the mixture. 

Roast the mixture for about 5 minutes until it becomes aromatic and the wheat flour (atta) changes color. Be careful of wheat flour getting burnt at the bottom if roasted for too long. 

Now turn the flame to low and let the mixture simmer for about 2 minutes until you see the ghee starts separating from wheat flour (atta) mixture.

Further add shaved/powdered jaggery and 1 1/4 cup milk (at room temperature) to the mixture. Give it a quick mix to ensure the milk doesn't burn at the bottom of the kadhai/ pan. Then add the soaked saffron to the kadhai/ pan. Combine everything well. 

Turn up the heat to medium and keep stirring the Sheera mixture to avoid any burning or sticking at the bottom of kadhai/ pan. After couple minutes milk will be completely absorbed in the Sheera mixture. 

Now pop the cardamom (Elaichi) pods and add them to the Sheera. Let the Sheera mixture cook for couple more minutes to ensure jaggery is completely melted and mixed up well with the rest of the mixture. 

Next add the remaining 1/4 cup milk to the mixture and combine well. This will allow the Sheera to loosen up. 

Finally add the nuts and raisins to the Sheera and mix it well. Cook the Sheera for another 3-5 minutes. At this point, turn off the flame and transfer the Sheera to a bowl and garnish with some more nuts. Our scrumptious and healthy Wheat (Atta) Sheera with Jaggery is ready to relish! Serve this Sheera hot or store it in a container in the fridge for up to a week. 


Thursday, October 22, 2020

Best Homemade Muesli


Healthy and easy breakfast recipe cannot get any easier once you prepare this Muesli at home. This is by far the best and most cost effective Muesli I have had compared to any store bought brands. This recipe is gluten free, egg free, vegan and vegetarian. The best part is there is no need to add sugar to it as it contains natural sweeteners. So no matter what your diet preferences are, you can enjoy this heart healthy and nutty Muesli for breakfast on any day of the week! It will keep you full until lunch time. So no need to look for junky snacks, thereby helping you stay focused on your office and/or school work. 

I was introduced to Muesli through my Mother-in-law during one of my visits back home. I liked the flavors back then and I started looking for it after we returned. However, after looking around for a while, I realized that it is so easy to prepare Muesli at home with my preferred ingredients and without additives. 

What is Muesli?

Originated in Switzerland, Muesli is a breakfast dish that is prepared by mixing rolled oats or grains along with various nuts, seeds and dried fruits. Muesli is not the traditional chewy oatmeal nor the crunchy granola, it is actually the healthier version of both. Unlike traditional oatmeal, Muesli is loaded with nutritious nuts, seeds and dried fruits. In addition, Muesli is much more healthier than granola as it does not contain any oils or sugars that is typically used to prepare granola.


What goes in the Muesli?

You can add any assortment of nuts, seeds and dried fruits of your choice, here are some suggestions. 
Nuts - Almonds, Pistachios, Walnuts, Pecans and Cashews
Seeds - Chia seeds, Flax seeds, Pumpkin seeds, Sunflower seeds, Sesame seeds
Dried fruits - Figs, Dates, Raisins, Coconut chips, Goji berries
To make it more attractive for kids, you can also add dark or milk chocolate chunks.
Just mix and match the combinations each batch you prepare and explore your creative side! 

Serving suggestions

Muesli can be paired with your choice of dairy or plant based milk and yogurt. You can also top up the nutty Muesli with some fresh fruits, dash of ground cinnamon, nutmeg or ginger powder and finally drizzle some maple syrup or honey if you need any additional sweetener. 

Important Notes/ Tips

  • I have used rolled oats for the recipe, but feel free to add any other rolled grains or corn flakes if you like to try different flavors.
  • I have toasted the rolled oats and nuts in the conventional oven but you can toast it in the toaster oven or on gas stove per your preference and availability of equipment.
  • I have not added any sweetener to the Muesli, however, you can add a tablespoon of maple syrup, honey or jaggery syrup at the end and mix everything well to coat evenly. If you add the sweetener than the shelf life for Muesli will reduce to a month. 
So here is the recipe for the Best Homemade Muesli that you can prepare and store until you use it up. 

Best Homemade Muesli 


Prepare time - 10 minutes

Toast time - 12 to 15 minutes

Yields - 4 Cups of Muesli

Ingredients

3 Cups Rolled Oats

1/3 Cup Silvered/chopped almonds

1/3 Cup Chopped walnuts

1/4 Cup Raisins

1/4 Cup Chopped dried figs

1/4 Cup Chia seeds

1/4 Cup pumpkin seeds

Instructions

Preheat oven to 350F and line a baking tray with parchment paper or silicone baking mat. You can skip this step if you are planning to toast the oats and nuts on the gas stove. 

In a big mixing bowl, combine rolled oats, chopped almonds, chopped walnuts and pumpkin seeds. Mix everything well with a spatula. Pour the mixture on the baking tray and spread it in a single flat layer. 

Bake the mixture in oven for 12-15 minutes while tossing it halfway through to avoid any burning of oats or nuts. When done you can smell a nice toasty aroma of oats and nuts. Let the oats mixture cool down a bit for 2 to 3 minutes and transfer it back to the mixing bowl.

Now add the chia seeds, raisins and chopped figs to the oats mixture. Combine everything well. The easy peasy and the best Homemade Muesli is ready to be stored in an airtight container. 

Begin your day with this nutritious Muesli prepared in your choice of milk or yogurt and fresh fruits!

To prepare Muesli with yogurt

In a bowl, take 1/4 Cup of Muesli and combine it with 1/3 Cup of yogurt. Mix well. Let it soak in yogurt for about 10 minutes before you consume it. The oats and the seeds need to be soaked completely to bring out the best flavor. Top it with fresh berries, some more nuts and seeds for the extra crunch and enjoy the bowl of goodness. 


To prepare Muesli with milk

In a bowl, take 1/4 Cup of Muesli and combine it with 1/2 Cup of milk. Mix well. Now, you can either soak it overnight in a jar by keeping it in the refrigerator or soak it in hot milk for at least 15-20 minutes prior to consuming it. The longer you soak the thicker the Muesli becomes. Finally, top it with freshly chopped apple and dash of cinnamon when you are ready to serve. You can also add some more nuts for the extra crunch. Enjoy the delicious warm bowl on a cool wintery morning. 

Wednesday, October 14, 2020

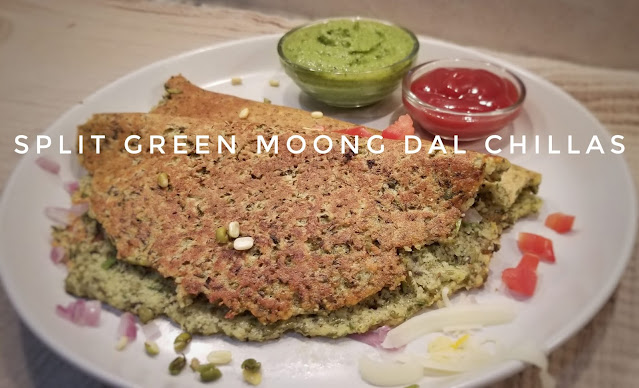
Split Green Moong Dal (Lentil) Chillas - 3 Ways


Split green moong dal (Lentil) Chilla is one of my favorite dish of all time. I have basically grown up having these protein packed chillas prepared by my mom. She prepared these Chillas in the most traditional way by grinding the dal in stone mortar and pastel, especially during the monsoon season. I have so many memories attached to this simple breakfast Chillas and also fried dal vadas (fritters) snacks! 

I have been preparing these Chillas at home for years now using mom's recipe. My toddler loves it too, especially when prepared with some delicious toppings. So, I have improvised the recipe a bit for kids by adding some tasty toppings. I have prepared these Chillas 3 ways - the basic Chilla, Tomato mozzarella Chilla and Onion Chilla - to please the taste buds of different age groups. 

These split green moong dal Chillas are not only gluten free but they are also vegan friendly. They are packed with protein, healthy carbs, fibers, Vitamin B, magnesium and many other minerals and essential amino acids that are essential for our body.

Important Notes/Tips

Be sure to soak the Split green moong dal (lentil) at least 4-6 hours and preferably overnight so that the dal (lentil) will soften up to grind into smooth batter.

I have used only 1 green chili for the recipe as I was preparing the Chillas for my toddler. But feel free to adjust the spice level per your taste.

I have prepared the batter in a food processor but you can also prepare it in a blender. You may have to blend it for a little longer to gain a smooth consistency depending on the type of blender.

To make this recipe completely vegan, just replace the dairy cheese with vegan cheese. 

Hing/asafoetida is an essential ingredient for the recipe, try not to skip it. It is easily available in any Indian grocery store or even on amazon. 


Split Green Moong Dal Chilla 


Prep time - 10 minutes

Cook time - 10 minutes

Yields - 6 to 8 Chillas


Ingredients 

1 Cup dry = 3 Cup soaked Split green moong dal/lentil (Soaked overnight or at least 6 hours) 

1 Green chili (Seeded)

1 Large piece Ginger

1/2 Tsp Hing/Asafoetida

1 Cup Cilantro (finely chopped)

1 Medium Tomato (Finely chopped)

1/2 Cup Mozzarella cheese 

1/2 Cup Red onion (Finely chopped)

Salt to taste

Water to prepare batter

Oil or Ghee to pan fry Chilla


Instructions  

Start by draining water from soaked Split green moong dal and adding it to a blender. Next add green chili, ginger, hing/asafoetida, half of the chopped cilantro and salt to moong dal. Adjust the quantity of green chilies as per your preference of spiciness. 

Now, blend everything to a smooth batter while adding water as necessary - the soaked split green moong dal already has some water content in it. So, add little water at a time. 

The batter should be thick but pouring consistency that can be spread over on a tawa/griddle. See the video for guidance. 

Now add few drops of oil and rub it over the tawa/griddle with a tissue. 

Heat up a tawa/griddle at medium high flame, it should be hot and ready to make Chillas. 

Turn heat down to medium, take ladle full of batter and pour it in the center of the tawa/griddle. Quickly spread the batter evenly in circular motion about 6 inches diameter, it should be slightly thick. See video for guidance.

From this point onwards, we can prepare the Chillas in 3 ways! 

for Basic Chillas

Drizzle some oil/ghee around the edges of Chilla, let it cook for 1-2 minutes. As the edges start leaving the sides, flip over the Chilla and cook for another minute. Fold the Chilla in half and the basic Split green moong dal (Lentil) Chillas are ready to serve.


for Tomato Mozzarella Chillas 

Sprinkle finely chopped tomatoes, mozzarella cheese and finely chopped cilantro over the Chilla. Drizzle some oil/ghee around the edges of Chilla and cover with a lid. Cook the Chilla for 2-3 minutes on medium flame until the cheese is nicely melted. We will not flip this Chilla because of the toppings in it. 

Fold the Chilla in half and delicious Tomato Mozzarella Chilla is ready to serve. 


for Onion Chillas

Sprinkle finely chopped red onions and cilantro over the Chilla. Drizzle some oil/ghee around the edges of Chilla and cover with a lid. Cook the Chilla for 1-2 minutes on medium flame. 

Fold the Chilla in half and tasty Onion Chilla is ready to serve. 

You can serve the Split green moong dal (Lentil) Chillas with green chutney or ketchup. We love these delicious protein packed Chillas for our morning breakfast or evening snack.