Showing posts with label healthy. Show all posts

Thursday, October 29, 2020

Wheat (Atta) Sheera with Jaggery


As we are getting closer to the Holiday season, it's time to start preparing the holiday delights for the family. I like to kickstart the holiday season with some healthy yet delicious dessert to keep our health in check. Here's one of the most favorite dessert/ meetha of my family - Wheat (Atta) Sheera during the auspicious festival of Navratri. Wheat (atta) sheera is a famous dessert or side in Western and North India. I have prepared this decadent dessert numerous times before and it has been loved by one and all. The Gujarati style wheat (atta) Sheera is one of the easiest dessert to prepare.  

This Sheera is made with just 7 simple ingredients that are easily available in Indian household. You just need whole wheat flour, jaggery, homemade ghee, milk, cardamom pods/powder, nuts and few saffron strands. While saffron strands are optional in the recipe but they give a distinct flavor and color to the Sheera. 

Traditionally, sugar is added to this Sheera as sweetener but to avoid decking up on all the unhealthy calories, I have prepared it by using jaggery instead. Though jaggery and sugar provide almost the same amount of calories, jaggery is considered more nutritious than refined sugar. In fact according some sources, jaggery benefits our bodies in numerous ways.

I have also used milk in preparing the Sheera instead of water to make it richer  and creamier in taste. Adding milk is optional but I have always added milk to it and I absolutely love the texture and the taste of the Sheera that is prepared using milk vs water. 

So without further ado, let's look at some important notes and then the recipe. 

Important Notes/ Tips

  • It is important to use thick bottom kadhai/pan to prepare the Sheera, it will help avoid burning of ghee and wheat flour (atta).
  • It is important to roast the wheat flour (atta) correctly. Do not over roast wheat flour, else it will get burnt and under roasting will give a raw taste.
  • Jaggery need to be shaved or powdered in order for it to melt quickly when mixed with wheat flour (atta) and ghee. Adjust the quantity of jaggery as per your liking. 
  • I have used ghee prepared at home for the recipe, you can always use store bought ghee. Here is my recipe for Homemade ghee if you like to see it. You can add little more ghee if you like but do not reduce ghee quantity else the Sheera will turn sticky.
  • I have added milk to prepare Sheera, however you can use water instead, in the equal quantity, if you like to keep this recipe vegan. Also, know that adding water will give darker color to Sheera. 
  • Be sure to use room temperature or lukewarm milk for the recipe. Cold milk will act against the hot kadhai/ pan and the Sheera mixture. 
  • You can store the Sheera in a container in the fridge for up to a week. Always warm it up before serving.

Wheat (Atta) Sheera with Jaggery


Prepare time - 5 minutes

Cook time - 20 minutes

Yields - 2 1/2 Cup Sheera


Ingredients

1 Cup Wheat flour (Atta)

3/4 Cup Melted ghee

3/4 Cup Shaved/powdered jaggery (adjust the quantity per your liking of sweetness)  

1 1/2 Cup Milk 

2-3 Pods of Cardamom (Elaichi) / 1 Tsp cardamom powder

Handful of cashew halves, silvered almonds and raisins

Few strands of saffron (optional)


Instructions

Heat up a kadhai/ pan on a medium flame. Add homemade ghee to the kadhai and heat it up for 1 minute. While ghee is heating up, take saffron strands in a small bowl and add a tablespoon of milk. Let it soak. 

Now add wheat flour (atta) to the heated ghee and combine it well. Keep stirring the mixture continuously with spatula or spoon to avoid any lumps in the mixture. 

Roast the mixture for about 5 minutes until it becomes aromatic and the wheat flour (atta) changes color. Be careful of wheat flour getting burnt at the bottom if roasted for too long. 

Now turn the flame to low and let the mixture simmer for about 2 minutes until you see the ghee starts separating from wheat flour (atta) mixture.

Further add shaved/powdered jaggery and 1 1/4 cup milk (at room temperature) to the mixture. Give it a quick mix to ensure the milk doesn't burn at the bottom of the kadhai/ pan. Then add the soaked saffron to the kadhai/ pan. Combine everything well. 

Turn up the heat to medium and keep stirring the Sheera mixture to avoid any burning or sticking at the bottom of kadhai/ pan. After couple minutes milk will be completely absorbed in the Sheera mixture. 

Now pop the cardamom (Elaichi) pods and add them to the Sheera. Let the Sheera mixture cook for couple more minutes to ensure jaggery is completely melted and mixed up well with the rest of the mixture. 

Next add the remaining 1/4 cup milk to the mixture and combine well. This will allow the Sheera to loosen up. 

Finally add the nuts and raisins to the Sheera and mix it well. Cook the Sheera for another 3-5 minutes. At this point, turn off the flame and transfer the Sheera to a bowl and garnish with some more nuts. Our scrumptious and healthy Wheat (Atta) Sheera with Jaggery is ready to relish! Serve this Sheera hot or store it in a container in the fridge for up to a week. 


Thursday, October 22, 2020

Best Homemade Muesli


Healthy and easy breakfast recipe cannot get any easier once you prepare this Muesli at home. This is by far the best and most cost effective Muesli I have had compared to any store bought brands. This recipe is gluten free, egg free, vegan and vegetarian. The best part is there is no need to add sugar to it as it contains natural sweeteners. So no matter what your diet preferences are, you can enjoy this heart healthy and nutty Muesli for breakfast on any day of the week! It will keep you full until lunch time. So no need to look for junky snacks, thereby helping you stay focused on your office and/or school work. 

I was introduced to Muesli through my Mother-in-law during one of my visits back home. I liked the flavors back then and I started looking for it after we returned. However, after looking around for a while, I realized that it is so easy to prepare Muesli at home with my preferred ingredients and without additives. 

What is Muesli?

Originated in Switzerland, Muesli is a breakfast dish that is prepared by mixing rolled oats or grains along with various nuts, seeds and dried fruits. Muesli is not the traditional chewy oatmeal nor the crunchy granola, it is actually the healthier version of both. Unlike traditional oatmeal, Muesli is loaded with nutritious nuts, seeds and dried fruits. In addition, Muesli is much more healthier than granola as it does not contain any oils or sugars that is typically used to prepare granola.


What goes in the Muesli?

You can add any assortment of nuts, seeds and dried fruits of your choice, here are some suggestions. 
Nuts - Almonds, Pistachios, Walnuts, Pecans and Cashews
Seeds - Chia seeds, Flax seeds, Pumpkin seeds, Sunflower seeds, Sesame seeds
Dried fruits - Figs, Dates, Raisins, Coconut chips, Goji berries
To make it more attractive for kids, you can also add dark or milk chocolate chunks.
Just mix and match the combinations each batch you prepare and explore your creative side! 

Serving suggestions

Muesli can be paired with your choice of dairy or plant based milk and yogurt. You can also top up the nutty Muesli with some fresh fruits, dash of ground cinnamon, nutmeg or ginger powder and finally drizzle some maple syrup or honey if you need any additional sweetener. 

Important Notes/ Tips

  • I have used rolled oats for the recipe, but feel free to add any other rolled grains or corn flakes if you like to try different flavors.
  • I have toasted the rolled oats and nuts in the conventional oven but you can toast it in the toaster oven or on gas stove per your preference and availability of equipment.
  • I have not added any sweetener to the Muesli, however, you can add a tablespoon of maple syrup, honey or jaggery syrup at the end and mix everything well to coat evenly. If you add the sweetener than the shelf life for Muesli will reduce to a month. 
So here is the recipe for the Best Homemade Muesli that you can prepare and store until you use it up. 

Best Homemade Muesli 


Prepare time - 10 minutes

Toast time - 12 to 15 minutes

Yields - 4 Cups of Muesli

Ingredients

3 Cups Rolled Oats

1/3 Cup Silvered/chopped almonds

1/3 Cup Chopped walnuts

1/4 Cup Raisins

1/4 Cup Chopped dried figs

1/4 Cup Chia seeds

1/4 Cup pumpkin seeds

Instructions

Preheat oven to 350F and line a baking tray with parchment paper or silicone baking mat. You can skip this step if you are planning to toast the oats and nuts on the gas stove. 

In a big mixing bowl, combine rolled oats, chopped almonds, chopped walnuts and pumpkin seeds. Mix everything well with a spatula. Pour the mixture on the baking tray and spread it in a single flat layer. 

Bake the mixture in oven for 12-15 minutes while tossing it halfway through to avoid any burning of oats or nuts. When done you can smell a nice toasty aroma of oats and nuts. Let the oats mixture cool down a bit for 2 to 3 minutes and transfer it back to the mixing bowl.

Now add the chia seeds, raisins and chopped figs to the oats mixture. Combine everything well. The easy peasy and the best Homemade Muesli is ready to be stored in an airtight container. 

Begin your day with this nutritious Muesli prepared in your choice of milk or yogurt and fresh fruits!

To prepare Muesli with yogurt

In a bowl, take 1/4 Cup of Muesli and combine it with 1/3 Cup of yogurt. Mix well. Let it soak in yogurt for about 10 minutes before you consume it. The oats and the seeds need to be soaked completely to bring out the best flavor. Top it with fresh berries, some more nuts and seeds for the extra crunch and enjoy the bowl of goodness. 


To prepare Muesli with milk

In a bowl, take 1/4 Cup of Muesli and combine it with 1/2 Cup of milk. Mix well. Now, you can either soak it overnight in a jar by keeping it in the refrigerator or soak it in hot milk for at least 15-20 minutes prior to consuming it. The longer you soak the thicker the Muesli becomes. Finally, top it with freshly chopped apple and dash of cinnamon when you are ready to serve. You can also add some more nuts for the extra crunch. Enjoy the delicious warm bowl on a cool wintery morning. 

Wednesday, October 14, 2020

Split Green Moong Dal (Lentil) Chillas - 3 Ways


Split green moong dal (Lentil) Chilla is one of my favorite dish of all time. I have basically grown up having these protein packed chillas prepared by my mom. She prepared these Chillas in the most traditional way by grinding the dal in stone mortar and pastel, especially during the monsoon season. I have so many memories attached to this simple breakfast Chillas and also fried dal vadas (fritters) snacks! 

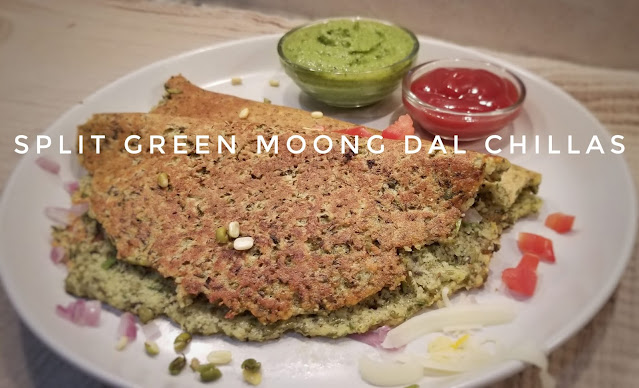
I have been preparing these Chillas at home for years now using mom's recipe. My toddler loves it too, especially when prepared with some delicious toppings. So, I have improvised the recipe a bit for kids by adding some tasty toppings. I have prepared these Chillas 3 ways - the basic Chilla, Tomato mozzarella Chilla and Onion Chilla - to please the taste buds of different age groups. 

These split green moong dal Chillas are not only gluten free but they are also vegan friendly. They are packed with protein, healthy carbs, fibers, Vitamin B, magnesium and many other minerals and essential amino acids that are essential for our body.

Important Notes/Tips

Be sure to soak the Split green moong dal (lentil) at least 4-6 hours and preferably overnight so that the dal (lentil) will soften up to grind into smooth batter.

I have used only 1 green chili for the recipe as I was preparing the Chillas for my toddler. But feel free to adjust the spice level per your taste.

I have prepared the batter in a food processor but you can also prepare it in a blender. You may have to blend it for a little longer to gain a smooth consistency depending on the type of blender.

To make this recipe completely vegan, just replace the dairy cheese with vegan cheese. 

Hing/asafoetida is an essential ingredient for the recipe, try not to skip it. It is easily available in any Indian grocery store or even on amazon. 


Split Green Moong Dal Chilla 


Prep time - 10 minutes

Cook time - 10 minutes

Yields - 6 to 8 Chillas


Ingredients 

1 Cup dry = 3 Cup soaked Split green moong dal/lentil (Soaked overnight or at least 6 hours) 

1 Green chili (Seeded)

1 Large piece Ginger

1/2 Tsp Hing/Asafoetida

1 Cup Cilantro (finely chopped)

1 Medium Tomato (Finely chopped)

1/2 Cup Mozzarella cheese 

1/2 Cup Red onion (Finely chopped)

Salt to taste

Water to prepare batter

Oil or Ghee to pan fry Chilla


Instructions  

Start by draining water from soaked Split green moong dal and adding it to a blender. Next add green chili, ginger, hing/asafoetida, half of the chopped cilantro and salt to moong dal. Adjust the quantity of green chilies as per your preference of spiciness. 

Now, blend everything to a smooth batter while adding water as necessary - the soaked split green moong dal already has some water content in it. So, add little water at a time. 

The batter should be thick but pouring consistency that can be spread over on a tawa/griddle. See the video for guidance. 

Now add few drops of oil and rub it over the tawa/griddle with a tissue. 

Heat up a tawa/griddle at medium high flame, it should be hot and ready to make Chillas. 

Turn heat down to medium, take ladle full of batter and pour it in the center of the tawa/griddle. Quickly spread the batter evenly in circular motion about 6 inches diameter, it should be slightly thick. See video for guidance.

From this point onwards, we can prepare the Chillas in 3 ways! 

for Basic Chillas

Drizzle some oil/ghee around the edges of Chilla, let it cook for 1-2 minutes. As the edges start leaving the sides, flip over the Chilla and cook for another minute. Fold the Chilla in half and the basic Split green moong dal (Lentil) Chillas are ready to serve.


for Tomato Mozzarella Chillas 

Sprinkle finely chopped tomatoes, mozzarella cheese and finely chopped cilantro over the Chilla. Drizzle some oil/ghee around the edges of Chilla and cover with a lid. Cook the Chilla for 2-3 minutes on medium flame until the cheese is nicely melted. We will not flip this Chilla because of the toppings in it. 

Fold the Chilla in half and delicious Tomato Mozzarella Chilla is ready to serve. 


for Onion Chillas

Sprinkle finely chopped red onions and cilantro over the Chilla. Drizzle some oil/ghee around the edges of Chilla and cover with a lid. Cook the Chilla for 1-2 minutes on medium flame. 

Fold the Chilla in half and tasty Onion Chilla is ready to serve. 

You can serve the Split green moong dal (Lentil) Chillas with green chutney or ketchup. We love these delicious protein packed Chillas for our morning breakfast or evening snack. 


Wednesday, October 7, 2020

Crumbled Breakfast Tofu


Breakfast is considered the most important meal of the day as it gives us the energy to begin our day. So naturally the kind of breakfast we eat makes great difference for our body. 

Hence, I have tried to prepare protein rich healthy breakfast that can be enjoyed by everyone in the family - the Crumbled Breakfast Tofu. It is super easy and quick to prepare with just a few ingredients. All you need is tofu, your choice of vegetables and some basic spices. Sauté some veggies, add crumbled tofu and spices and the delicious breakfast tofu is ready to serve. You can serve this Breakfast tofu however you like it. My family enjoy eating it over some nicely toasted bread and fresh fruits or fruit juice. 

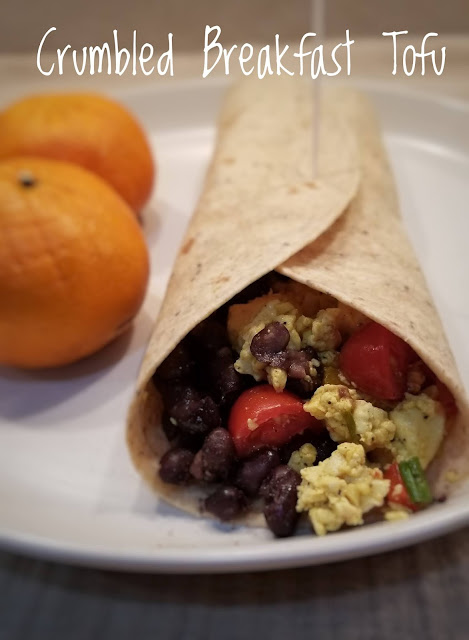
You can also prepare this simple crumbled breakfast tofu and turn it into an extravagant weekend breakfast by adding some beans, salsa and avocados to it. Serve it over a tortilla and viola you have a giant breakfast burrito ready to devour. This Tex-Mex breakfast is seriously tasty and can be enjoyed with a cup of coffee or fresh juice. 


Important Tips/ Notes

Before we get started let's go over some Tofu 101  and other tips.

Silken Tofu vs Firm Tofu - There are different types of Tofu available in the store ranging from Silken Tofu to Extra Firm Tofu. For this recipe, I have used 1 block of silken tofu and 1 block of firm tofu. Silken tofu is very soft which adds creaminess to our Crumbled Breakfast Tofu. While firm tofu, as the name suggests, is firm that can be sliced or chopped according to the need of the recipe. Here I have crumbled it in my palms as we don't need it to hold any shape. Firm tofu gives the texture to this dish. Hence, I suggest to use both silken and firm tofu. However, you can still prepare this amazing breakfast if you have either one of the two types of tofu. The outcome texture will be different.

Pressing the Tofu - Usually tofu holds a lot of water/moisture that need to be drained out before cooking. I have only pressed my tofu for few minutes as we are going to cook it until water evaporates. However, you can press it overnight or for few hours if you are able to do it. The longer the pressing time, the lesser the cooking time and firmer the tofu.

Vegetables - This recipe is very flexible for the types of vegetables that you may want to add to your Crumbled Breakfast Tofu. I have only added colorful bell peppers and tomatoes for the recipe. But here are some of my favorite vegetables to add to this breakfast tofu - Spinach, mushrooms, broccoli, zucchini and squash. Feel free to add the vegetables to your liking. 

Spices - The spices used in the recipe are mostly available in pantry except black salt/ kala namak/ sanchal and nutritional yeast. You can skip black salt if you wish, however it does add some nice flavor to the dish. Nutritional yeast is another ingredient that is not commonly found in pantry. But you can easily replace it with some parmesan cheese or you can completely skip adding it. Instead you can sprinkle regular cheddar or mozzarella cheese at the end. 


Crumbled Breakfast Tofu 

Prep time - 10 minutes

Cook time - 10 minutes 

Serves 4-6 

Video recipe -


Ingredients

1 Pack Silken tofu (14 oz/ 397 gm)

1 Pk Firm/Extra firm tofu  (14 oz/ 397 gm)

1/3 Cup Colorful bell peppers chopped

1/3 Cup Cherry tomatoes halved

1 Chili finely chopped (optional)

1 Clove of garlic minced 

2 Spring onions chopped

Salt to taste

1/2 Tsp Black pepper powder

1/2 Tsp Black salt 

1/4 Tsp Turmeric powder

1 Tbsp Nutritional Yeast (optional)

1 Tbsp Oil


Instructions

We will begin with removing extra moisture from silken tofu and firm tofu. Open the container of silken tofu and wrap a paper towel or clean cloth around it. Turn it upside down in a plate, this will absorb the excess water out of tofu without breaking it. Also, remove firm tofu from its container and wrap a paper towel or clean cloth around it to absorb excess moisture. See video for guidance. 

After 10-15 minutes, remove the paper towel from around the silken tofu container. Roughly mash it with a fork. Do to not make a paste. After that remove the paper towel from around the firm tofu. In a plate, crumble the firm tofu in your palms. 

Next, we will heat up oil in a pan at medium flame and add minced garlic and spring onion whites. Sauté for a minute until raw smell of garlic is gone. Do not burn garlic.

Add green chili and bell peppers to the pan and sauté for another minute. 

Add mashed silken tofu and crumbled firm tofu to the pan and gently combine it with the sautéed vegetables. 

After that add salt, black pepper powder, turmeric powder, nutritional yeast and black salt to the pan and give it a good mix. 

Turn heat to low and let it simmer for 5 minutes while stirring occasionally. The excess water from tofu will evaporate slowly. You may have to simmer for longer time depending on the amount of water in tofu.

At the end, add cherry tomato halves to the pan and combine everything well before turning off the heat. Garnish with spring onion greens.

The quick and easy Crumbled Breakfast Tofu is ready to serve with your choice of bread or tortilla. This complete breakfast is healthy and a great source of fiber and protein to start your day! 

Wednesday, September 30, 2020

Avocado Toast 2 ways


Morning breakfast is always a challenge especially with kids during school days. It is important to have some healthy and fulfilling breakfast ideas handy. Avocado toast is one such breakfast that is delicious and fulfilling. The warm crusty bread paired with creamy avocados is just the best combination. It is one of the favorite breakfast items in my household and I make it frequently as it is super easy and quick to put it together. There are various ways to prepare Avocado Toast to please your taste buds. I am going to share two preparation styles for this wholesome breakfast - Tomato basil avocado toast and Loaded avocado toast! But before we begin with the recipe, here are some points to keep in mind when buying avocados. 

Pick the right avocados

It is very tricky to find that perfect avocado that is not too ripe or too raw. We all desire to pick just that perfect creamy avocado that you can cut open and scoop out! There is a three step process that can help you choose the right avocado from the stack. 

  • First is the color test - when you are shopping for avocados, look for the ones that are dark green in color. Avoid picking black as well as light green colored avocados. Usually the black ones are over-ripe while the light green ones are under-ripe.  
  • Second is the touch test - if the avocado is too hard it is usually under-ripe, whereas if it feels too soft or if there is a slack it is probably over-ripe. Hold the avocado in your palm and gently squeeze it, if it's ripe then it should feel soft but not mushy. 
  • Lastly, do a cap check - As a final check, peel back the cap or stem from the top of the chosen avocados. You should see green color under the top. This would confirm that the avocado is just ripe and perfect for use. However, if you see brown color then it is mostly an over-ripe avocado. 

Hence, always do these quick tests to find the best avocados to prepare the creamiest Avocado toasts. 

Important Tips/ Notes - 

  • I have used avocado cutter for cutting and scooping avocado. You can use knife or spoon if you don't have it handy. However, if you are like me who eats avocados quite often then I would suggest to get one of the avocado cutters as they are very useful. 
  • For the recipes I have used sweet cherry tomatoes, however you can easily substitute them with any sweet ripe tomatoes that are available to you.
  • Any type of thick bread slice can be used for the recipe. I have used sourdough bread for the recipe, but I have also prepared the toasts using honey wheat bread. They both work just fine.
  • Be sure to toast the bread slice nicely until golden crispy, so that it can hold the weight of the avocado and the toppings and does not sag down. 
  • I have used yellow bell pepper for the recipe as they are lightly sweet but you can certainly use red bell peppers if that's easily available to you.
  • For the loaded avocado toast, I have sprinkled everything bagel seasoning on it. You can also make the seasoning at home or simply switch it with plain toasted sesame seeds or any other seeds that you prefer.


Avocado Toast 2 ways 

Tomato Basil Avocado Toast

Prep time - 10 minutes

Yields - 2 Toasts


Ingredients

2 Slices of bread

1 Medium ripe avocado

6-8 Cherry Tomatoes

Handful of Sweet basil leaves

1 Tsp Extra virgin olive oil 

Salt & Pepper to taste

Instructions

Cut avocado in half and remove the seed. Now in a large bowl, scoop out the flesh of avocado using avocado cutter or big spoon. Now mash it up with a fork to your desired smoothness or chunkiness. 

Further, toast bread slices in the toaster or oven while we prepare the rest of the toppings.

Thinly slice the cherry tomatoes and finely chop the sweet basil leaves as shown in the video. 

When the bread slices are nicely toasted, spread the creamy mashed avocado on top. Top with half the slices of cherry tomatoes and basil leaves. Sprinkle some salt and pepper to your liking. Finally, drizzle some extra virgin olive oil. Repeat the same with the next slice of toasted bread.

The delicious creamy Tomato Basil Avocado Toasts are ready to enjoy with coffee or juice. 


Loaded Avocado Toast

Prep time - 15 minutes

Yields - 3 Toasts

Ingredients

3 Slices of toasted bread

1 Medium ripe avocado (pitted and peeled)

1 Clove of garlic

1 Spring onion 

1 Small carrot

1 Large slice of yellow bell pepper

1/2 Lemon

2 Medium radish

1 Tsp Extra virgin olive oil 

1 Tsp Red chili flakes

1 Tbsp Everything bagel seasoning 

2 Cherry tomatoes (optional)

2-3 Sweet basil leaves (optional)

Salt to taste

Instructions

Start with toasting the bread slices to golden brown.

Next, finely chop garlic and thinly slice spring onion. Add them to pitted and peeled avocado flesh in a bowl. Add sliced cherry tomatoes and basil leaves. Squeeze in lemon juice. Mash and combine everything well. 

Now dice yellow bell pepper and carrot while thinly slicing the radish. Add both yellow bell pepper and carrot to the mashed avocado mix. Add in extra virgin olive oil, pinch of salt and red chili flakes. The everything bagel seasoning also has some salt so do not add too much salt in this step. Combine well. 

Spread the loaded avocado mix on the toasted bread slice. Top with radish and generous sprinkle of everything bagel seasoning. Repeat on the remaining bread slices. The Loaded super healthy and full of colorful veggies Avocado toasts are ready to gobble. 


Tuesday, September 1, 2020

Chocolate Strawberry Truffles


It is true that food has no language yet it speaks louder than words. Chocolate and strawberry are great examples. They echo love, care and affection. There are no words needed to express your feelings when you have these two by your side. 

Chocolates are my all time favorite dessert. I love them even more when they are paired with fruit or nut. This makes it almost impossible for me to resist them. I still remember when I had first tried the strawberry dipped in chocolate fountain. It was smooth chocolate layer over the juicy red strawberry that tasted heavenly! I have just improvised that simple dessert to make these truffles. I have tried to keep this recipe healthier by including natural sweetener and avoiding white flour. I don't count chocolate as unhealthy 😉, in fact dark chocolate is considered healthy food by most.

As the festive season is approaching, I am sharing this simple yet decadent dessert recipe with you all - Chocolate Strawberry Truffles! These truffles are utterly delicious and will be a delight for your friends and family to enjoy during the holidays. These Chocolate Strawberry Truffles are prepared with just a few simple ingredients and the best part is that you don't even need any fancy equipment to make them. All you need is a blender to mix all the ingredients together. After that just make some strawberry balls, dip them into ooey gooey creamy melted chocolate and freeze them before they are ready to devour.  

Let's dive into the recipe with this short video followed by detailed recipe...


Notes/Tips


  • I have used store bought almond flour, but it is very easy to make it at home. Basically soaked and blanched almonds are powdered using a blender. 
  • To make oats flour, simply place the rolled oats in a blender and blend them to a powder consistency. 
  • To make these truffles extra sweet, just increase the quantity of dates to 3/4th cup. 

Ingredients


1 cup Strawberry fresh or frozen

1/2 cup Pitted dates

1 cup Almond flour

1/2 cup Oats flour

1 cup Semi-sweet or dark chocolate chunks

1/2 tsp vanilla extract (optional)


Yields 12-16 pieces

Prep time - 15 minutes

Cool time - 1.5 hours


Instructions


We will start off with hulling strawberries if you are using fresh ones. You will also need to pit the dates to remove the seeds if you are not using pitted ones. 

Now add the strawberries, dates and vanilla extract to a blender to blend into a smooth paste.

Next, add the almond flour and oat flour and blend everything together in a thick paste. Transfer the mixture to a bowl.

Take a spoon full of the mixture or dough and make 12 to 16 equal sized balls. Place the strawberry balls on parchment paper in a tray and chill them in the freezer for about 20-30 minutes. 

Melt the chocolate chunks in a microwave or on a double boiler. Transfer the melted chocolate in a small deep bowl. 

Now dip the strawberry balls in the melted chocolate, coat them well and place them back on the parchment paper. 

Place the tray in the freezer for about an hour until the chocolate hardens. Our decadent Chocolate Strawberry Truffles are ready to devour. 

Store them in an airtight container in the freezer. They should stay good for about a week. Enjoy!


Tuesday, August 25, 2020

Sugar free Dates & Nuts Rolls

Desserts are always so much fun to prepare and enjoy with family especially during festive season. But it also comes with some guilt of consuming all the unwanted sugar! Hence, sometimes I try to sneak in some healthy desserts on my list that can be indulged guilt free. :) So here I am today with sugar free, gluten free, butter free Dates & Nuts Rolls. 


These rolls are made with just a few simple and natural ingredients. It is a breeze to make these Dates & Nuts Rolls as they can be prepared within few minutes. Just chop your choice of nuts, add seeds, dates & ghee, settle the mixture in fridge for an hour and voila you are ready to cut the delicious rolls into pieces. Sometimes, I like to make laddoos instead of roll if I don't want to wait for it to set in the fridge. You can really try various ways to present this dessert, depending on the occasion. The flavors come from the roasted nuts and sweetness comes from the dates. If you like nuts then you are definitely going to love these nutty sweet delights. These rolls are a wonderful delight for those who are trying to watch their sugar, weight or just trying to eat or feed healthy to their family. 


Nutritional Value


Nuts (Dry fruits) - I have used almonds, walnuts, pistachios and cashews to make this dessert. Nuts are considered one of the healthiest snack and are an excellent source of healthy fats, protein, vitamins (especially vitamin B & E) and minerals (mainly Magnesium). In fact according to Healthline.com, almonds, walnuts, pistachios and cashews are among the top 9 nuts to eat for better health.


Dates - Dates are one of the super foods and are packed with nutrition. They are a great source of fibers, vitamins and minerals including but not limited to potassium, magnesium, copper and vitamin B. Dates are a natural sweetener and also full of antioxidants. Here are some of the known health benefits of Dates - help improve digestion, bone health and skin health; also help lower cholesterol. 


You can also call them Energy rolls as they are packed with bunch of nutrients. Here is a quick video to help you get started followed by detailed recipe...


Yields 10 -12 pieces
Prepare time 15 minutes 
Cook time 10 minutes 

Ingredients


1/3 Cup chopped almonds
1/3 Cup chopped walnuts
1/3 Cup chopped cashew
1/4 Cup chopped pistachio
1/4 Cup Pumpkin seeds
1 Tbsp khas-khas/ poppy seeds
1 1/4 Cup pitted dates
1 Tbsp ghee/ clarified butter

Instructions 


Start by roughly chopping all the nuts by knife as chopping in food processor will yield into more fine powder than chunks. Next, coarsely grind pitted dates in the food processor or blender. Just make sure to not blend the dates into puree. 

Now heat up a sauce pan on a low-medium flame and add ghee/ clarified butter. Next as ghee starts to melt, add poppy seeds/ khas-khas to the pan along with pumpkin seeds. Roast them for about a minute until poppy seeds start turning slight brown. 

Now add coarsely ground or crushed dates to the pan. Mix them well with the seeds by smashing and stirring for another minute. 

Further add all the chopped nuts including almonds, walnuts, cashews and half of the pistachios. Incorporate the nuts with the crushed dates mixture so that dates are evenly coating the nuts. 

Continuously stir the mixture for another 2-3 minutes or until everything starts coming together as a dough. Turn off the flame and allow the mixture to cool for about 5 minutes.

Now roll the mixture to form a log. I made 2 logs and joined them at the end which turned out to be easier and faster rather than trying to form one big log. 

Tightly wrap the logs in a parchment paper or foil and refrigerate for an hour to settle. After an hour, take the log out and unwrap. 

Now spread some ghee and sprinkle over some finely chopped pistachios and poppy seeds. Roll the dates and nuts log over it to evenly coat poppy seeds and pistachios. This step is optional but will beautify your rolls for more attractive presentation. 

Lastly, cut the log into thick slices (about 1/4" thick) and the delicious Sugar free Dates & Nuts rolls are ready to relish. 


Additional Notes/ Tips


Any combination of nuts and seeds can be used to make this delicious dessert. 

I have used less dates and more nuts in my recipe as I just love the nutty flavor and my family likes less sweeter taste. Feel free to increase amount of dates to 1 1/2 cup to have sweeter taste and fudgy texture.
 

Tuesday, August 18, 2020

Quinoa & Oats Idli - No fermentation, no soaking

Idli, sambhar and chutney is a classic South Indian breakfast that is prepared and savored by almost all the households in India. Typically Idlis are made of fermented rice and urad dal (lentil) batter but lately there have been many variations to this classic dish, mostly to reduce the preparation time or add more flavors. I have also tried different versions of Idli and I like the Quinoa & Oats Idli the most as it is by far the quickest and healthier version of all that I have tried. These fluffy and soft Idlis are sure to brighten up your morning. 

Traditionally Idlis are eaten for breakfast, but I enjoy eating these delicious soft Idlis for any meal of the day! These Quinoa & Oats Idlis can be prepared in less than 45 minutes including grinding flour and resting the batter for few minutes. Unlike rice Idlis, these do not need any soaking of dals or fermentation which saves so much time and efforts. Just grind the Quinoa and Oats, mix with rava and yogurt, rest the mixture for few minutes and ta-da you are ready to pour the batter into Idli trays. So easy and time saving especially on those busy work days. Moreover, these Quinoa & Oats Idlis are packed with nutrients. 

Nutritional Value

Quinoa as we know is one of the super foods. But, is it a super grain or super seed? Fun fact - Widely known as whole grain, Quinoa is actually a seed from amaranth family. This super food is high in fiber, full of antioxidants and minerals, rich in protein, yet lean. Due to such high nutritional value, Quinoa provides great health benefits and also serves as one of the popular diet foods for those trying to lose some extra pounds. :)


Oats are incredibly nutritious, in fact they are considered one of the healthiest grains of all. They are an excellent source of minerals, vitamins, antioxidants, fibers and protein. According to various sources, Oats have many health benefits including lowering cholesterol, maintain blood sugar, and help you keep fuller for longer. 


So without further ado, See recipe video below followed by detailed step by step recipe...


Serves 4-6
Prepare time - 25 minutes
Cook time - 15 minutes

Ingredients

1/2 Cup quinoa 
1/2 Cup oats
1/2 Cup rava
1/2 Cup curd/yogurt
1/3 Cup sweet corn (optional)
2 Cup water
1 Tsp salt
1 Tsp fruit salt or baking soda
Water for steamer
Oil for greasing Idli trays


Instructions 

Start by dry roasting oats in a pan on a medium flame for 2 to 3 minutes. Blend the dry roasted oats into a fine flour in the blender and transfer into a large mixing bowl. 


Now dry roast quinoa for 2-3 minutes in the same pan and blend it to fine flour in a blender. Transfer the quinoa flour in the mixing bowl along with oats flour. 


Dry roast rava in the pan and add to the mixing bowl.


Add salt and give everything a nice mix. 


Next add yogurt and mix again. Now add water little at a time to make a smooth runny batter. Cover the bowl with a lid and rest the batter for 15 minutes.


In the meanwhile, take Idli steamer and add 1 1/2 cup water to it. Turn on the flame at medium to start heating up the water inside. Also, grease the Idli trays with oil and keep them aside.


After 15 minutes, check the batter to see if you need to add any water as the flours would have soaked all the extra water. Now, the batter should be of thick consistency but if it looks dry then adjust it by adding little water as required.

Now add sweet corn and stir in the fruit salt or baking soda in the batter, it will form some foam on the top which is fine.


Take a spoon and start pouring the batter into greased Idli trays.


Place the trays in the steamer and close the lid. Turn the flame on medium high and set the timer for 14 minutes.


After 14 minutes, turn off the flame and open the steamer after 5 minutes. Take off the Idli trays and let them cool down for another 5-10 minutes.

Gently scoop out the soft and spongy Idlis from the trays, transfer them to a bowl and cover them with a lid or cloth to keep the Idlis soft. 


Serve these light and fluffy Quinoa & Oats Idlis with coconut chutney and hot piping sambhar to make a perfect breakfast! 


Additional notes/ tips

I have only added sweet corn but you can add veggies like carrots or peas whatever is available in your refrigerator. 
 
You can dry roast the quinoa, oats and rava ahead of time and keep them in airtight container to save some extra time. 

You can also blend the dry roasted quinoa and oats to fine flour ahead of time. 

Wednesday, August 5, 2020

Avocado Spinach Paratha

Do you like Avocados? Do you like Spinach? If you answered no to either of the two, you are sure to change your mind after trying the recipe I am sharing today! I promise, you will start loving these two super greens after you try this healthy Avocado Spinach paratha (bread). If you answered yes, then you definitely want to try the recipe to fall in love with them again.These soft, melt-in-mouth parathas can be served with either a bowl of cool yogurt or warm soup of your choice. Treat upon these delicious Avocado Spinach paratha for your next meal for breakfast, brunch, lunch or dinner and you will be in for a surprise!


Avocados are one of my favorite fruits that turn into my meal at times when I am limiting my intake of carbs and calories. The creamy and soft avocados are easy to prepare and very fulfilling. Also, Avocados are an excellent source of Omega-2 fatty acids (fats that are good for our body), beta carotene, potassium and magnesium. 


On the other hand, spinach is exceptionally nutrient rich leafy vegetable packed with fiber, iron, calcium, vitamins C & K. Spinach is versatile and can be eaten raw in salads, cooked as curry or pureed for smoothie, soup or added in parathas to help sneak in some greens in your kids' diet. 


Here I have combined these two super nutrients to make some delightful parathas that can be enjoyed by adults and kids alike. My family loves these parathas. I always prepare enough of them to last for evening snack or next day breakfast. My kid just rolls up the paratha and eats it without any fuss.


Let's get started with the recipe...

Serves 4-6
Prepare time -20 minutes
Cook time - 20 minutes


Ingredients -


4 Cup Wheat flour
1 Big or 2 small Avocado
3 Cup Spinach
1 Green chili
1 Small piece of ginger
Water as needed
Salt per taste
1 Tsp red chili powder
1/2 Tsp turmeric powder
1/2 Tsp Cumin powder
1/2 Tsp sugar (optional)
2 Tbsp oil
Oil for frying Paratha


Instructions -


Peel and slice Avocado(s). Cut the stems of spinach and wash the leaves. Add them both to the blender along with green chili, ginger and some water. Puree the mixture, transfer it to a bowl and set aside. Make sure the puree is not too watery. It should have thick consistency like a smoothie. 


Now add wheat flour along with all the dry ingredients, oil and spinach-avocado puree to food processor to prepare a soft dough. You can also prepare dough by adding all the elements in a mixing bowl and kneading into a soft dough by hand. You may use a little bit of water to knead dough if necessary. Also, be sure to add the puree little by little while kneading dough.


Cover the dough and set it aside for 10-15 minutes. After that make about 10-12 equal balls from this dough.


Roll out about 8 inch diameter parathas on chakla or rolling board with rolling pin. Use some dry wheat flour to prevent the parathas from sticking on the board. 


Put Paratha on hot tawa/griddle, flip when bottom starts to cook and you see some brown spots.


Brush a little bit of oil or ghee on both side. Lightly press with flat spatula on both sides, paratha will puff up as it cooks completely.


Hot and yummy Avocado Spinach Parathas are ready to serve!. You could enjoy these warm Parathas with either some chilled yogurt or warm soup. Eat well!