Wednesday, September 30, 2020

Avocado Toast 2 ways


Morning breakfast is always a challenge especially with kids during school days. It is important to have some healthy and fulfilling breakfast ideas handy. Avocado toast is one such breakfast that is delicious and fulfilling. The warm crusty bread paired with creamy avocados is just the best combination. It is one of the favorite breakfast items in my household and I make it frequently as it is super easy and quick to put it together. There are various ways to prepare Avocado Toast to please your taste buds. I am going to share two preparation styles for this wholesome breakfast - Tomato basil avocado toast and Loaded avocado toast! But before we begin with the recipe, here are some points to keep in mind when buying avocados. 

Pick the right avocados

It is very tricky to find that perfect avocado that is not too ripe or too raw. We all desire to pick just that perfect creamy avocado that you can cut open and scoop out! There is a three step process that can help you choose the right avocado from the stack. 

  • First is the color test - when you are shopping for avocados, look for the ones that are dark green in color. Avoid picking black as well as light green colored avocados. Usually the black ones are over-ripe while the light green ones are under-ripe.  
  • Second is the touch test - if the avocado is too hard it is usually under-ripe, whereas if it feels too soft or if there is a slack it is probably over-ripe. Hold the avocado in your palm and gently squeeze it, if it's ripe then it should feel soft but not mushy. 
  • Lastly, do a cap check - As a final check, peel back the cap or stem from the top of the chosen avocados. You should see green color under the top. This would confirm that the avocado is just ripe and perfect for use. However, if you see brown color then it is mostly an over-ripe avocado. 

Hence, always do these quick tests to find the best avocados to prepare the creamiest Avocado toasts. 

Important Tips/ Notes - 

  • I have used avocado cutter for cutting and scooping avocado. You can use knife or spoon if you don't have it handy. However, if you are like me who eats avocados quite often then I would suggest to get one of the avocado cutters as they are very useful. 
  • For the recipes I have used sweet cherry tomatoes, however you can easily substitute them with any sweet ripe tomatoes that are available to you.
  • Any type of thick bread slice can be used for the recipe. I have used sourdough bread for the recipe, but I have also prepared the toasts using honey wheat bread. They both work just fine.
  • Be sure to toast the bread slice nicely until golden crispy, so that it can hold the weight of the avocado and the toppings and does not sag down. 
  • I have used yellow bell pepper for the recipe as they are lightly sweet but you can certainly use red bell peppers if that's easily available to you.
  • For the loaded avocado toast, I have sprinkled everything bagel seasoning on it. You can also make the seasoning at home or simply switch it with plain toasted sesame seeds or any other seeds that you prefer.


Avocado Toast 2 ways 

Tomato Basil Avocado Toast

Prep time - 10 minutes

Yields - 2 Toasts


Ingredients

2 Slices of bread

1 Medium ripe avocado

6-8 Cherry Tomatoes

Handful of Sweet basil leaves

1 Tsp Extra virgin olive oil 

Salt & Pepper to taste

Instructions

Cut avocado in half and remove the seed. Now in a large bowl, scoop out the flesh of avocado using avocado cutter or big spoon. Now mash it up with a fork to your desired smoothness or chunkiness. 

Further, toast bread slices in the toaster or oven while we prepare the rest of the toppings.

Thinly slice the cherry tomatoes and finely chop the sweet basil leaves as shown in the video. 

When the bread slices are nicely toasted, spread the creamy mashed avocado on top. Top with half the slices of cherry tomatoes and basil leaves. Sprinkle some salt and pepper to your liking. Finally, drizzle some extra virgin olive oil. Repeat the same with the next slice of toasted bread.

The delicious creamy Tomato Basil Avocado Toasts are ready to enjoy with coffee or juice. 


Loaded Avocado Toast

Prep time - 15 minutes

Yields - 3 Toasts

Ingredients

3 Slices of toasted bread

1 Medium ripe avocado (pitted and peeled)

1 Clove of garlic

1 Spring onion 

1 Small carrot

1 Large slice of yellow bell pepper

1/2 Lemon

2 Medium radish

1 Tsp Extra virgin olive oil 

1 Tsp Red chili flakes

1 Tbsp Everything bagel seasoning 

2 Cherry tomatoes (optional)

2-3 Sweet basil leaves (optional)

Salt to taste

Instructions

Start with toasting the bread slices to golden brown.

Next, finely chop garlic and thinly slice spring onion. Add them to pitted and peeled avocado flesh in a bowl. Add sliced cherry tomatoes and basil leaves. Squeeze in lemon juice. Mash and combine everything well. 

Now dice yellow bell pepper and carrot while thinly slicing the radish. Add both yellow bell pepper and carrot to the mashed avocado mix. Add in extra virgin olive oil, pinch of salt and red chili flakes. The everything bagel seasoning also has some salt so do not add too much salt in this step. Combine well. 

Spread the loaded avocado mix on the toasted bread slice. Top with radish and generous sprinkle of everything bagel seasoning. Repeat on the remaining bread slices. The Loaded super healthy and full of colorful veggies Avocado toasts are ready to gobble. 


Wednesday, September 23, 2020

Baked Eggplant Parmesan - Vegetarian


Eggplant Parmesan is one of the classic Italian dishes that I was introduced to, through a friend of mine a few years ago. It was absolutely delicious when I first tried it and soon became one of my favorite dishes to order in a restaurant until I found out that it is really not completely vegetarian. This classic Italian dish uses egg as one of the basic ingredient and most restaurants' menu never has it listed. Sadly I quit ordering it, however sometimes I would crave for that authentic Eggplant Parmesan. Hence, inspired by the original classic dish, I decided to give this dish a try to see if I can make the eggless version of it. Though this was not the only reason for me to create this recipe. Eggplant is my husband's all time favorite vegetable and I wanted to make sure we can both enjoy our favorite Italian dish without having to worry about its ingredients.

To my surprise, I ended up making a pretty darn good Eggplant Parmesan recipe that is neither fried nor has eggs. The main challenge is to perfect the breadcrumb parmesan mixture and to make sure that the eggplants are cooked to perfection. This recipe covers both these aspects to get the best and most delicious Eggplant Parmesan. The breaded eggplant slices are coated with breadcrumb parmesan mixture and baked till perfectly tender then served with layers of marinara sauce and cheese. You can make this recipe for a date night or for celebration dinner or just to please your guests. Serve it complemented with the marinara sauce spaghetti or avocado pesto sauce spaghetti. My family just loves this dish every time I make it.

So let's get started with some important tips and notes to keep in mind before we dive into the recipe.

Important Tips/ Notes

  • Eggplant Parmesan is much like lasagna but without all the extra carbs from pasta. Try using the smaller eggplants that are ripe and have shiny skin. The smaller eggplants have less seeds and are less bitter. 
  • I have used store bought marinara sauce for this recipe to save time. But if you are feeling the pump to make fresh marinara then go for it. It will add 30-35 minutes but you will get an even better taste out of it.
  • Traditionally the breaded eggplant slices are fried first and then layered with marinara sauce and cheese to bake for few minutes. I have completely eliminated frying, and instead baked them with drizzle of olive oil to save ourselves from the unhealthy fats and calories. 
  • I have retained the skin of eggplant but if you like, feel free to peel the skin before you slice it. This will reduce cooking time a little bit so just keep check on your eggplant slices to avoid overcooking.
  • I have used garlic salt for the recipe. If you don't have it handy just use garlic powder or minced garlic and salt. 
  • I have used Panko bread crumbs for the recipe as they turn out extra crispy but any traditional breadcrumbs would also work.
  • I have used lesser quantity of cheese as we are not big on it. Feel free to add more cheese if you like your Eggplant Parmesan to be covered in cheese. 
  • Last but not the least, vegetarian cheese is an essential ingredient of this recipe. A lot of cheese brands use enzymes from animal rennet to prepare cheese, so look for vegetarian rennet or microbial rennet on the ingredients label of the cheese should you prefer to keep this recipe vegetarian.

Alright, so here is the video for the recipe, followed by detailed step by step recipe -


Baked Eggplant Parmesan Recipe 

Prep time - 45 minutes

Cook time - 35-40 minutes

Yield - Serves 5


Ingredients

2 Medium Eggplant

1 Cup Breadcrumbs

1/2 Cup Parmesan cheese (grated)

2 Tsp Black pepper powder

1 Tbsp Oregano

1 Tsp Dried basil

Handful of freshly chopped basil (optional)

1/2 Tsp Garlic salt

1 Cup All purpose flour

2 1/2 Cups Marinara sauce

1 Cup Shredded cheese (mozzarella or four cheese mix)

Water to make the batter

Olive oil to drizzle


Instructions

Begin with preparing Eggplant for baking. Slice the eggplants into 1/4" thick rounds and lay them on a cooling rack or a tray. Sprinkle the slices with salt and let them sweat for 15 minutes to release the moisture. 

While eggplant slices are resting, let's prepare the breadcrumb mixture. Combine breadcrumbs, Parmesan cheese, black pepper powder, oregano, basil (both fresh and dried) and garlic salt in a shallow mixing bowl.

Preheat the oven at 425F before we move further with the recipe.

Now prepare the dipping batter in another mixing bowl by combining dry all purpose flour and water. The consistency of the dipping batter should be rather runny than thick.

Further, pat dry eggplant slices to absorb the extra moisture gathered on top. 

Line the baking tray with foil and brush some oil on it to avoid sticking to the bottom of the slices.

Now, prepare your assembly line of eggplant slices, batter, breadcrumb mixture and baking tray in the same order. Take one slice, dip it in the batter and generously coat it in the breadcrumb mixture. Line each breaded eggplant slice in the baking tray and drizzle some olive oil over it. Please ensure to follow this step while using my video recipe as it is important to bake the slices perfectly.

Place the baking tray in oven and bake the breaded eggplant slices at 425F for 25 minutes or until the breading starts turning golden brown. Turn over the slices midway through the baking after approximately 12 minutes. 

Remove the baked eggplant slices from oven and place it on a cooling rack. 

Take another oven-safe pan or tray and spread marinara sauce at the bottom. In order to make a 3 tier tower of eggplant parmesan, place the first layer of the slices (the large ones) over the sauce. Now spread some marinara sauce and shredded cheese on top of the laid out breaded slices. Repeat this step while you stack the next two layers of breaded eggplant slices over this bottom layer as shown in the video above. I was short on shredded cheese so ended up topping the final layer with some cheese slice cuttings.

Bake these towers of Eggplant Parmesan in the oven at 350F for 15 minutes. 

Remove from the oven and let them rest for 5 minutes before serving. 

Serve these no-egg and no-fry Baked Eggplant Parmesan with your choice of spaghetti with red or green sauce. You can also garnish it with fresh basil or red chili flakes if you like is spicy. 


Friday, September 18, 2020

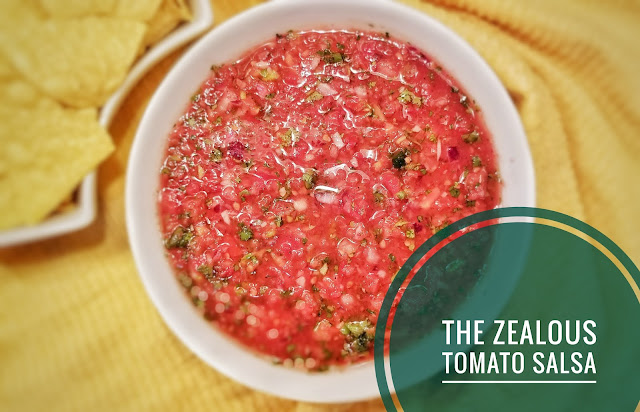
The Zealous Tomato Salsa


Salsa is a Mexican table condiment that is served with almost any Mexican or Spanish meal. Salsa in Spanish literally translates to sauce. The Salsa can be served in many different ways. However, my absolute favorite is the Tomato Salsa. The zealous Tomato Salsa is made with the freshest ingredients. It is full of flavors and tastes just amazing every time you make it. If you love tomatoes then you have to try this Salsa. It is absolutely addictive!

By now, you would have known that I love tomatoes and anything I make from Tomatoes is out of passion and love for them. This Tomato salsa is our go-to snack on the weekends or family nights. I make this Salsa along with the spicy Guacamole and chips and we are sorted for the evening. This Salsa stays good for almost up to a week in the air tight container in fridge. So once I make it, I can use it for taco night, or to make Mexican rice or for evening snack time. To top it off, it is so easy to prepare with just a few ingredients. Just add tomatoes, onion, garlic, cilantro, lemon juice along with some herbs in the food processor or blender and voila the zealous Tomato Salsa is ready to dip in. 


Important Notes/ Tips

I have used Roma tomatoes for this recipe. I prefer them as they are usually firm which helps avoid salsa from becoming too watery.

I have used one Serrano pepper as we like our salsa to be on the milder side. Feel free to add 2-3 Serrano per your liking of spice level. Alternatively, you can also use Jalapeño peppers.

Try and use fresh ingredients as noted in the recipe to get the best flavor out of the salsa.

If you find the salsa to be too tangy, you can add pinch of sugar to balance the flavors.

I have used a can of diced tomato to keep thicker consistency of the Salsa. It is an optional ingredient, however, the salsa may turn out to be a little more watery if not used. It would still taste equally amazing!

I have made the Salsa using food processor. You can also use blender or electric food chopper instead. However, if you use a blender then pay special attention to the consistency of Salsa to prevent it from turning into puree.

Here is a short video followed by detailed recipe -


Ingredients

4-5 Fresh ripe medium size tomatoes 

1 can of diced tomatoes (10 oz) - optional

1/2 medium Red onion 

2 medium Garlic cloves

1/2 cup chopped Cilantro

1 Serrano pepper 

1 Medium Lemon juice 

Salt and Pepper to taste

1/3 Tsp Oregano

1/4 Tsp cumin powder


Instructions

Start with preparing the veggies. Cut the tomatoes into quarts and roughly chop the onion, garlic cloves and cilantro. Remove stem and seeds from the Serrano pepper.

Now add all the ingredients into a food processor and pulse in bursts to finely chop all the contents.

Open the lid and adjust the taste for salt, pepper or lemon juice. Enjoy right away with tortilla chips or store in an airtight container for up to a week in the refrigerator. 


Tuesday, September 15, 2020

Vegetarian Mexican Rice - Better than Restaurant!


Mexican rice or Spanish rice is a widely known accompaniment to Mexican dishes like Enchiladas, Fajitas or Tacos. Most Mexican restaurants that I have visited, serve this rice as a side dish of plain red rice. However, today I am going to share this amazing Spanish rice (arroz rojo) recipe with you today that can almost be eaten as an entree or can be used as a filling for Burritos. This appetizing recipe is loaded with flavors and comes together under 30 minutes!

My recipe calls for some of the basic ingredients that are easily found in most household pantries. These ingredients include tomatoes, onions, garlic, cumin powder, beans and the star of dish Rice. The best part about this Spanish/Mexican Rice is that it is very flexible with the types of vegetables that can be added to it. So this can be used as last minute recipe whenever you are running out of ideas and need something fulfilling that is easy to prepare yet tasty. We have had this tasty rice for lunch by itself with a side of chips and for dinner as a side in our tacos and my family has enjoyed them both ways.

Nutritional Value

Although there are lots of debate over rice being healthy or unhealthy, I believe that any grains eaten in moderation and cooked with just the right ingredients are always healthy. According to the sources, Rice has been consumed by people all around the globe for thousands of years! It has been part of many cultures and many cuisines due to it's ability to pick up any flavors and seasonings that it is cooked with. White rice is low in fat and has almost no cholesterol. It is a good source of energy and very easy on our stomach, i.e. it is easy to digest as compared to whole grain. Moreover, rice is naturally gluten free, so it is one of the best options for people with gluten intolerance. Rice is mostly paired with or cooked with vegetables or protein to help balance out the nutritional value. 

Important Notes/ Tips

For this recipe, I have used long grain white rice (preferred) but you can choose to use any variety of rice. Traditionally, the long grain white rice is used to prepare Spanish/Mexican rice as it is less starchy and does not stick. However, the cooking time will vary depending on the type of rice. 

To give additional flavor punch to this recipe, you can also add chopped red bell pepper and spring onions to it. 

I have used fresh made salsa for the recipe, but feel free to use store brand salsa.

So here is a quick video for the recipe followed by detailed recipe...


Ingredients

1 Cup Long grain white rice 
3/4 Cup Canned Black beans
1/2 Cup Salsa
1/3 Cup Corn kernels
1/4 Cup Tomato sauce
1 Lemon wedge
3-4 Garlic cloves
2 Tbsp Olive oil
1 Tbsp Cumin powder
1 Tsp Oregano
1 Tsp Black pepper powder
1/2 Tsp Paprika
1 Bay leaf 
Salt to Taste
1 1/2 Cup Water (to cook rice) 


Prep time - 15 minutes
Cook time - 7 minutes
Serves - 4 

Instructions

Heat up the Instant pot on saute mode and add olive oil. 

Mince garlic cloves and add to the heated oil. Saute for a minute until raw smell of garlic is gone. 

Now add corn kernels and saute for another minute. 

Next, add rinsed and washed rice to the pot. Saute the rice until it is lightly toasted. Be sure to stir the rice continuously to prevent from sticking to the bottom of the pan.

Add black beans to the pot and mix well with rice. Cook for another minute.

Now add tomato sauce and all the spices to the pot. Mix everything well and saute for 1 more minute. Further add the homemade fresh salsa and mix well with the rice mixture.

Finally add water and stir everything well making sure no rice is sticking to the bottom.

Close the Instant pot lid and change the setting to Pressure Cook mode. Select low pressure and set for 7 minutes. Be sure to keep the vent on sealing while pressure cooking.

When pressure cooking is done, turn off the Instant pot and quick release the pressure. Perform this step carefully as Instant pot is very hot at this time, turn the valve to venting position safely using spoon or spatula. 

Carefully open the lid and squeeze in half a lemon on top of rice. Gently fluff rice using a fork. 

Transfer the rice to a bowl or a plate and garnish with cilantro. Our scrumptious and flavorsome Vegetarian Mexican rice is ready to relish! Eat this rice as a meal with some tortilla chips and guac or use it as filling for burritos or tacos. 


Tuesday, September 8, 2020

Homemade Ghee


Ghee is one of the staple ingredient in almost all Indian household and is used to prepare various cuisines throughout India and other Asian countries. Ghee is a versatile ingredient that can be consumed in various dishes in multiple ways. I use Ghee to spread over roti/chapati, toast bread, make curries, add dollop over dal-rice, idlis as well as parathas, fry certain snacks and saute vegetables. Ghee has high smoking point which makes it perfect for frying. Since we love to include Ghee in our daily diet, I have started making Ghee at home. Trust me, the homemade Ghee tastes way better than any other store bought brand and it is incredibly easy to prepare. 

So what is Ghee anyway?

Ghee is also known as clarified butter. Basically, Ghee is melted butter that has been simmered to separate out milk solids and heated further to bring out the most delicious nutty flavor. This liquid gold is then strained to a jar and can be stored on a shelf for as long as six months or refrigerated for upto a year!!

What are the benefits of adding Ghee to diet?

Originated in ancient India, Ghee has many medicinal properties and has been used in Aayurveda for thousands of years. There are many health benefits of Ghee, particularly the ghee made from grass fed cows' butter. Ghee is known for its anti inflammatory properties which is used to externally treat burns and swellings.

According to various sources, Ghee has abundance of nutrients including vitamins A, D, E and K  and healthy fats including Omega 3s. Ghee is an excellent source of antioxidants - more specifically vitamin E. These vitamins and fats are essential for healthy brain function and healthy immune system. There are plenty more health benefits of consuming Ghee on daily basis that can be found online. However, the most important thing to remember here is to consume this super food in moderation to get the most out of it. 

So, let's get started with the recipe. 

Here is a short video on how to make Ghee followed by detailed recipe.


Important Notes/ Tips 

I have used electric cooker to make Ghee, however you can achieve the same result using a thick bottom pot on stove top but the cooking time will vary. The key is to keep a check on the status of ghee to ensure you can get to the same end result.

I have used unsalted butter but you can also use salted butter, just know that the Ghee will also have slightly salty flavor. Also, salted butter will take just a little less time to cook as compared to unsalted butter.

Be sure to start with room temperature butter to yield the best end product and to reduce cook time! Just bring the butter blocks outside of fridge about an hour before. 


Ingredients 

4 slabs of unsalted Butter - 8 oz each 


Cook time - 20 minutes

Yields - 32 Oz 


Instructions


Start off by turning on the saute mode of your electric cooker at medium/normal temperature. 

Add all the four butter slabs into the pot as the pot starts to heat up.

In about 5 minutes, all the butter will melt into liquid form. Make sure to stir the liquid butter occasionally to prevent it from burning at the bottom.

In about the next 1 minute, it will start simmering and bubbling. The foam will start forming on the top of the melted butter. Let the butter cook for another 3-4 minutes and the foam will start clearing up. 

At about 10 minutes, butter will start spluttering big bubbles, and foam will have cleared up. 

Continue cooking the butter for next 5 minutes as the simmered butter will start taking a golden color and will turn aromatic. Any additional foam will turn into clear bubbles and the liquid will become translucent. There will also be milk solids separating from the liquid.

At this point, turn off the electric cooker to avoid overcooking the ghee. The pot will gradually cool down in about 5 minutes and the Ghee will continue to cook during this time. Slowly the bubbles on top will turn into frothy layer and the liquid will turn into clear golden brown Ghee. All the milk solids will sit at the bottom. 

All the cooking is done at this point. Now, let the Ghee cool down for about an hour. After that, strain and transfer the Ghee to a jar or a storage container. 

Let it sit overnight and Ghee will become viscous and light yellow! Enjoy. 


Tuesday, September 1, 2020

Chocolate Strawberry Truffles


It is true that food has no language yet it speaks louder than words. Chocolate and strawberry are great examples. They echo love, care and affection. There are no words needed to express your feelings when you have these two by your side. 

Chocolates are my all time favorite dessert. I love them even more when they are paired with fruit or nut. This makes it almost impossible for me to resist them. I still remember when I had first tried the strawberry dipped in chocolate fountain. It was smooth chocolate layer over the juicy red strawberry that tasted heavenly! I have just improvised that simple dessert to make these truffles. I have tried to keep this recipe healthier by including natural sweetener and avoiding white flour. I don't count chocolate as unhealthy 😉, in fact dark chocolate is considered healthy food by most.

As the festive season is approaching, I am sharing this simple yet decadent dessert recipe with you all - Chocolate Strawberry Truffles! These truffles are utterly delicious and will be a delight for your friends and family to enjoy during the holidays. These Chocolate Strawberry Truffles are prepared with just a few simple ingredients and the best part is that you don't even need any fancy equipment to make them. All you need is a blender to mix all the ingredients together. After that just make some strawberry balls, dip them into ooey gooey creamy melted chocolate and freeze them before they are ready to devour.  

Let's dive into the recipe with this short video followed by detailed recipe...


Notes/Tips


  • I have used store bought almond flour, but it is very easy to make it at home. Basically soaked and blanched almonds are powdered using a blender. 
  • To make oats flour, simply place the rolled oats in a blender and blend them to a powder consistency. 
  • To make these truffles extra sweet, just increase the quantity of dates to 3/4th cup. 

Ingredients


1 cup Strawberry fresh or frozen

1/2 cup Pitted dates

1 cup Almond flour

1/2 cup Oats flour

1 cup Semi-sweet or dark chocolate chunks

1/2 tsp vanilla extract (optional)


Yields 12-16 pieces

Prep time - 15 minutes

Cool time - 1.5 hours


Instructions


We will start off with hulling strawberries if you are using fresh ones. You will also need to pit the dates to remove the seeds if you are not using pitted ones. 

Now add the strawberries, dates and vanilla extract to a blender to blend into a smooth paste.

Next, add the almond flour and oat flour and blend everything together in a thick paste. Transfer the mixture to a bowl.

Take a spoon full of the mixture or dough and make 12 to 16 equal sized balls. Place the strawberry balls on parchment paper in a tray and chill them in the freezer for about 20-30 minutes. 

Melt the chocolate chunks in a microwave or on a double boiler. Transfer the melted chocolate in a small deep bowl. 

Now dip the strawberry balls in the melted chocolate, coat them well and place them back on the parchment paper. 

Place the tray in the freezer for about an hour until the chocolate hardens. Our decadent Chocolate Strawberry Truffles are ready to devour. 

Store them in an airtight container in the freezer. They should stay good for about a week. Enjoy!